Why Does Yard Drainage 2026
You've probably noticed puddles that stick around long after the rain stops, or watched water creep toward your foundation when it should be running away. Why does yard drainage fail in some properties while neighbors stay dry? The answer usually boils down to soil type, grading mistakes, or a combination of factors that turn your lawn into a shallow pond every time it storms.
Most residential building codes require a minimum 2% slope away from the foundation, which translates to roughly 1/4 inch of drop per foot. When that grade doesn't exist or your soil can't absorb water fast enough, you're stuck with standing water, erosion channels, and potential foundation damage. Let's walk through how to identify your specific problem and match it to the right fix.
Quick Answer
Yard drainage fails when water can't move away from surfaces or soak into the ground. Clay-heavy soil, flat or negative grading, high water tables, and compacted earth all block normal water flow. Downspouts that dump too close to the house make it worse.
Most drainage problems stem from poor initial grading or soil that won't percolate. Fixing it means identifying which condition applies to your yard, then adding slope, subsurface drains, or outlet points.
What Yard Drainage Actually Means (And Why It Fails)
Yard drainage refers to how water moves across and through your property after rain or irrigation. Proper drainage means water flows away from structures, soaks into the soil, or exits through a designed outlet like a swale, French drain, or municipal storm drain. When drainage fails, water sits on the surface, saturates the root zone, or seeps toward your foundation.
Drainage systems rely on two forces: gravity and percolation. Gravity pulls water downhill along the surface and through underground pipes. Percolation is the rate at which water soaks into soil, measured in inches per hour.
If either force is blocked, water backs up. That's when you see puddles, soggy grass, or erosion.
Most homes are built with positive drainage grading during construction. The lot is shaped so the surface slopes away from the foundation at least 2% over the first 10 feet. Over time, soil settles, landscaping changes the grade, or compaction from foot traffic and equipment squeezes out the air pockets that let water infiltrate.
What worked in year one stops working by year five.
Common failure points include clay-heavy soil with percolation rates below 0.5 inches per hour, flat terrain where gravity can't move water, high water tables that fill subsurface voids, and hardpan layers that block downward drainage. Downspouts that discharge within 10 feet of the house dump hundreds of gallons during a storm right where you don't want it. If you've added patios, decks, or walkways without rerouting runoff, you've concentrated the flow and made the problem worse.
The Real Reasons Water Won't Leave Your Yard
Your Soil Is Working Against You
Soil composition controls how fast water moves through the ground. Sandy loam drains at 2 to 6 inches per hour. Clay soils drain at 0.1 to 0.5 inches per hour.
If your yard is mostly clay, a moderate rainstorm dumps water faster than the soil can absorb it. The surface stays wet for days, grass roots suffocate, and you're left with mud.
Clay particles are tiny and pack tightly. When wet, they swell and stick together, sealing off the pore space where water would normally flow. When dry, clay hardens like concrete.
Organic matter and air pockets are scarce. Even if you've got decent surface grading, water has nowhere to go once it hits that clay layer 6 inches down.
A simple percolation test reveals your soil's drainage capacity. Dig a hole 12 inches deep and 6 inches wide. Fill it with water and let it drain completely.
Fill it again and measure how many inches drop in one hour. Anything under 1 inch per hour means you're dealing with slow-draining soil that needs subsurface help, not just surface grading.
Compacted soil behaves like clay even if it started as loam. Construction equipment, repeated foot traffic, and vehicle weight squeeze out air and crush soil structure. The top few inches become dense and impermeable.
Water sheets off instead of soaking in. You'll often see compaction problems near driveways, walkways, and play areas.
The Grading Was Never Right to Begin With
Proper grading slopes away from the house at a minimum of 2%, which equals 1/4 inch per foot or about 2.5 inches over 10 feet. Many builders meet code during final inspection, then topsoil settles, sod gets laid without adjusting the grade, and within a year the slope flattens or even reverses. Negative grading sends water toward the foundation instead of away.
Flat yards pose a different challenge. There's no slope to drive surface flow. Water sits wherever it lands until it evaporates or soaks in.
If your soil is clay, it doesn't soak in fast enough. If you're at the bottom of a slope and all your neighbors' water runs onto your lot, you're acting as the neighborhood catch basin.
Grading problems are invisible until it rains. Walk your property during or right after a storm. Look for areas where water collects, paths where it flows, and spots where it pools against the foundation or patio.
Mark those zones with flags. That's your drainage map.
Regrading is often the simplest fix for minor issues. Adding 2 to 4 inches of topsoil near the foundation and sloping it away can redirect surface water. For larger problems, you'll need to scrape and reshape the yard with a skid steer or hire a grading contractor.
If you've got landscaping, hardscaping, or underground utilities, regrading becomes expensive and disruptive.
You've Got a Water Table Problem
The water table is the underground level where soil is fully saturated. In some regions, especially low-lying coastal areas or near rivers, the water table sits within 2 feet of the surface. During wet seasons or after heavy rain, it rises even higher.
When the water table is high, there's no room for new water to soak in. Your yard acts like a sponge that's already soaked.
High water tables show up as constantly damp or squishy soil, even during dry weather. Dig down 18 inches and you might hit standing water. Grass stays green without irrigation, but roots rot because they're submerged.
Basements and crawl spaces flood. French drains and dry wells can't lower a naturally high water table, they just move the water sideways to a lower outlet.
If your property sits in a flood zone or near wetlands, check the USDA soil survey for your county. Soil maps show drainage class: well-drained, moderately well-drained, somewhat poorly drained, or poorly drained. Poorly drained soils have a high seasonal water table.
You'll need to design drainage around that permanent condition, not try to fix it.
Solutions for high water tables include daylighting subsurface drains to a lower area, installing a sump pump system to mechanically lift water out, or raising planting beds above the saturated zone. You won't eliminate the water, but you can manage where it goes.
Compaction Turned Your Lawn Into a Parking Lot
Soil compaction reduces pore space by 30% to 50%. Water that used to infiltrate in 10 minutes now takes an hour or never makes it past the surface. Compaction happens gradually.
Every pass of a mower, every footstep, every season of freeze-thaw cycles squeezes soil particles closer together.
You can spot compaction by testing soil resistance. Push a screwdriver or soil probe into the ground. If you meet hard resistance in the top 6 inches, you've got compaction.
Grass in compacted areas grows thin and patchy. Water beads up and runs off instead of soaking in.
Core aeration helps, but it's a temporary fix for the top few inches. Heavily compacted yards need deeper intervention: ripping with a tiller, adding compost to restore organic matter, or even replacing the top 12 inches of soil. For areas with constant traffic, consider permeable pavers or gravel pathways instead of trying to keep grass alive.
Compaction often combines with poor grading. You might have decent slope, but if the soil won't absorb water, surface flow overwhelms the shallow path and pools wherever the grade flattens. Fixing one without the other won't solve the problem.
Downspouts and Hardscaping Are Dumping Water in the Wrong Place
A typical roof sheds 600 gallons of water for every inch of rain per 1,000 square feet. If your downspouts discharge 3 feet from the foundation, all that volume hits the ground in a concentrated area. Even well-drained soil can't absorb it fast enough.
The water flows along the foundation, finds cracks, and seeps into the basement or crawl space.
Downspout extensions should carry water at least 10 feet from the house, ideally onto a slope or into a gravel pathway that disperses flow. Buried downspout drains work even better. They connect to solid pipe that runs underground to a pop-up emitter, dry well, or storm drain.
The water never touches the surface near your foundation.
Hardscaping concentrates runoff. Patios, driveways, and walkways are impermeable. Every drop that lands on them runs off.
If those surfaces slope toward the house or dump onto a flat lawn, you've turned a manageable amount of rain into a flood. Design hardscaping to drain away from structures and direct runoff to planted areas or drainage inlets.
Retaining walls and raised beds change how water flows across your yard. They can create dams that trap water uphill or channels that accelerate flow. If you've added hardscaping or walls without adjusting drainage, you've likely made your problem worse.
The fix involves rerouting runoff with swales, channel drains, or underground pipe.
How to Diagnose Your Specific Drainage Problem
Effective diagnosis starts with observation during and right after rain. Grab a pair of boots and walk your property while water is moving. You'll see where it comes from, where it goes, and where it stalls.
Take photos and mark problem zones with spray paint or flags. This is your baseline.

Walk Your Yard After a Heavy Rain
Timing matters. Go out while it's raining or within an hour after the rain stops. Look for standing water, flowing channels, and areas where water collects.
Pay attention to spots near the foundation, low corners of the yard, and transitions between grass and hardscaping.
Watch how fast water disappears. If it drains within an hour, your soil is probably fine and you've got a grading issue. If puddles last 6 to 12 hours, your soil drains slowly.
If water sits for days, you've got clay, compaction, or a high water table.
Trace the flow. Where does roof runoff hit the ground? Does water from the neighbor's lot cross into yours?
Are there natural channels or ruts where water carves a path? Identify the sources and the endpoints. That tells you how much water you're managing and where it needs to go.
Look for secondary clues: moss or algae growth, soggy soil that stays soft, dead patches of grass, erosion grooves, and sediment deposits. These tell you where water lingers and where it moves too fast.
Check the Slope With a Level
Slope is the most critical factor in surface drainage. You need to measure it accurately. Use a 4-foot or 8-foot level and a tape measure.
Place the level on the ground near the foundation with one end touching the house. Lift the other end until the bubble centers. Measure the gap between the level and the ground.
Divide that height by the length of the level.
For example, if you lift the level 2 inches over a 4-foot span, that's 2 inches divided by 48 inches, or roughly 4% slope. That's good. If you only lift it 1/2 inch, that's about 1%, which is marginal.
If the ground slopes toward the house, you've got negative grading and water is flowing the wrong way.
Check slope in multiple directions: away from the house, across the yard, and toward any planned drainage outlets. Flat spots and depressions show up as areas where the level doesn't need to be lifted at all. Those are your problem zones.
A longer board or straight edge helps measure slope across larger distances. For a 10-foot span, you want at least 2.5 inches of drop (2% minimum). Mark high and low points on your property map.
This guides where you'll need to add fill, remove soil, or install subsurface drains.
Run a Simple Percolation Test
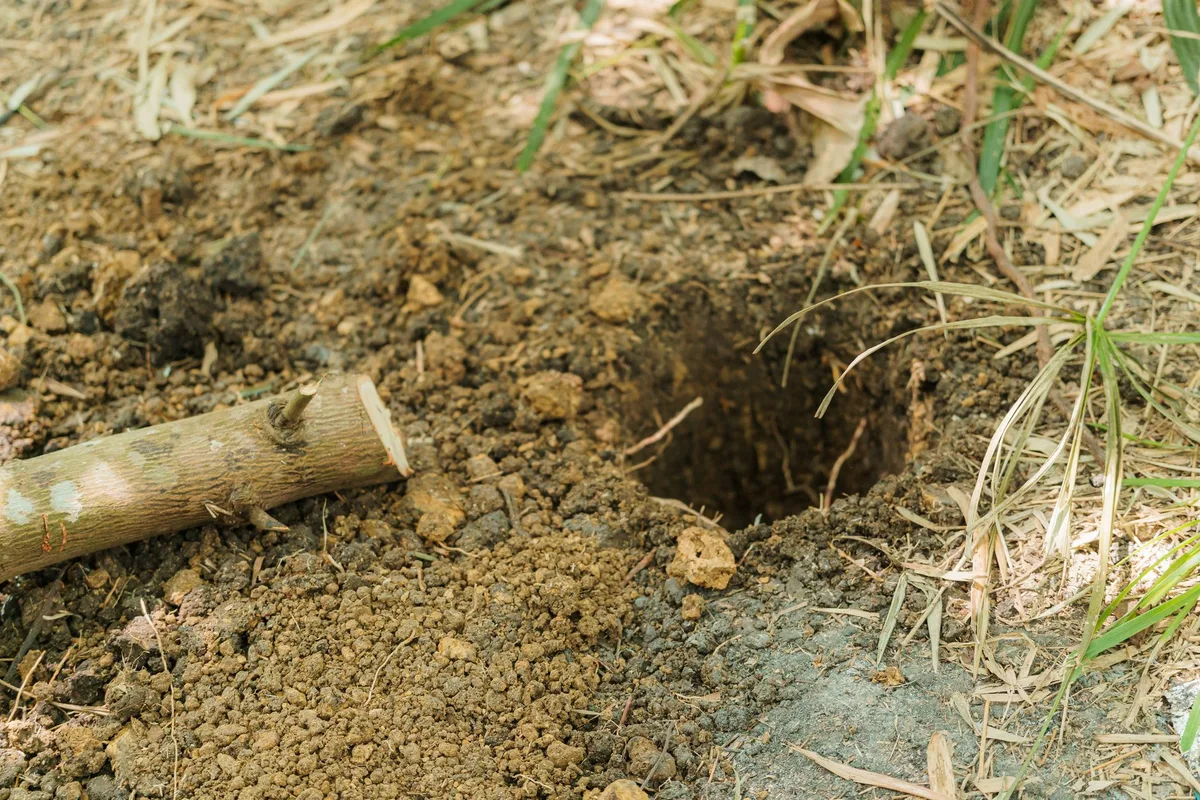
A percolation test measures how fast water moves through your soil. You'll need a shovel, a ruler, a timer, and a bucket of water. Dig a hole 12 inches deep and 6 inches wide in the area where you're having drainage problems.
Scrape the sides and bottom to remove any smeared clay or compaction glaze.
Fill the hole with water and let it drain completely. This pre-soaks the soil so your test reflects normal conditions. Once it's empty, fill the hole again to a depth of 6 inches.
Measure how much the water level drops over one hour. If it drops 2 inches or more, you've got good drainage. If it drops less than 1 inch, your soil is slow and you'll need subsurface help.
Clay soils often drain at 0.2 inches per hour or less. Sandy soils can drain 4 inches per hour or more. Loam sits in the middle at 1 to 2 inches per hour.
Repeat the test in a few spots across your yard. Drainage capacity varies, especially if you've got layers of topsoil over clay subsoil.
If water barely drains or sits indefinitely, you've hit a hardpan layer or the water table. Dig deeper to confirm. If you hit saturated soil or standing water at 18 inches, subsurface drainage won't work without an outlet below that level.
You'll need to route water laterally to a lower area or use a sump pump.
Trace Where the Water Actually Goes
Every drainage fix depends on having an outlet. Water has to go somewhere. Walk your property and identify potential discharge points: a street gutter, a storm drain inlet, a ditch, a low area of your lot, or a neighbor's property if you have an easement.
Measure the distance from your problem area to the outlet. Calculate the elevation drop. You need at least 1% slope (1 inch per 8 feet) for underground pipe to drain by gravity.
If there's no elevation drop, you'll need a pump or a surface swale.
Check local regulations. Many municipalities prohibit draining onto sidewalks, into sanitary sewers, or onto neighboring property without permission. Some require permits for any work that alters stormwater flow.
Call your city or county stormwater department before you start digging.
Map your findings on paper or with a simple sketch. Mark water sources, problem zones, existing slopes, and potential outlets. This becomes your drainage plan.
You'll know where to add grading, where to install a French drain, and where the water will ultimately end up.
Identify If It's Surface Water or Subsurface Water
Surface water runs across the top of the soil. It's visible during and right after rain. You'll see it flow, pool, and eventually evaporate or soak in.
Surface problems are solved with grading, swales, and catch basins.
Subsurface water moves underground. It can come from a high water table, lateral flow through soil layers, or seepage from uphill. You won't see it unless you dig.
Signs include constantly damp soil, wet basements, and springs or seeps that appear during wet seasons. Subsurface problems need French drains, curtain drains, or sump systems.
Sometimes you've got both. Roof runoff creates surface flow, but once it soaks in, it hits a clay layer and moves sideways underground until it emerges downhill. Diagnosing this requires digging test holes and watching where water appears during rain.
If you're not sure, dig a trench 18 inches deep in your problem area. Wait for rain. Check the trench a few hours later.
If water is sitting in the bottom, you've got subsurface flow or a high water table. If the trench is dry but the surface is wet, it's a surface problem. This tells you whether you need shallow surface drains or deeper subsurface pipe.
Decision Guide: Which Drainage Solution Matches Your Problem
Once you've identified your specific conditions, you can match them to the right fix. Drainage solutions aren't one-size-fits-all. What works for a flat clay yard won't work for a sloped sandy lot with a high water table.
Use this decision framework to narrow your options.
Standing Water in Flat Spots → Surface Grading or Swales
If water pools in low areas and your soil drains reasonably well (more than 1 inch per hour on a percolation test), you've got a grading problem. The solution is to reshape the surface so water flows to an outlet instead of sitting still.
Regrading means adding soil to low spots and sloping it toward a swale, ditch, or storm drain. You need at least 2% slope (1/4 inch per foot) for surface flow to work. If the low spot is small, you can add a few inches of topsoil, tamp it lightly, and reseed.
For larger areas, hire a contractor with a skid steer to recontour the yard.
Swales are shallow vegetated channels that collect and convey surface water. They're typically 6 to 12 inches deep with gently sloped sides. Grass or native plants stabilize the soil and slow the flow to prevent erosion.
Swales work best when you have a long run and a mild slope. They're low-cost and low-maintenance, but they take up space and won't handle subsurface water.
If you can't add enough slope for a swale, install a catch basin at the low point. Connect it to underground pipe that drains to an outlet. The catch basin collects surface water and funnels it into the pipe.
This keeps your lawn dry without altering the grade.
Soggy Areas With Clay Soil → French Drain or Curtain Drain
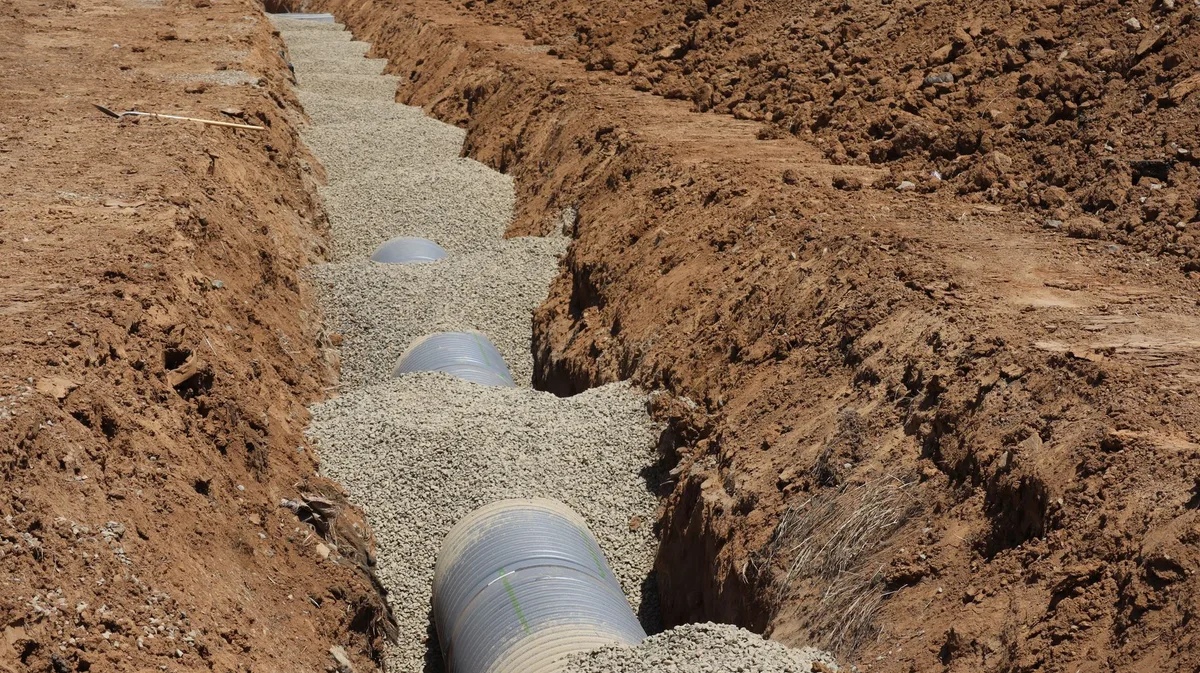
Clay soil that won't percolate needs subsurface drainage. A French drain intercepts water before it reaches the problem area and carries it away underground. It's a gravel-filled trench with perforated pipe at the bottom, wrapped in filter fabric to keep soil out.
Dig the trench 18 to 24 inches deep and 12 inches wide. Slope it at least 1% toward the outlet (1/8 inch per foot minimum, 1/4 inch per foot is better). Lay 3 inches of drain rock in the bottom, place the perforated pipe with holes facing down, then cover with another 6 inches of rock.
Wrap the whole assembly in landscape fabric before backfilling with soil.
Curtain drains are shallow French drains placed uphill of a problem area to intercept surface and shallow subsurface flow. They're typically 12 to 18 inches deep and follow the contour of the slope. Water enters the pipe through the perforations, flows downhill inside the pipe, and exits at a lower point.
Curtain drains work well on slopes where water is moving laterally through the soil.
Both systems need an outlet. The pipe must daylight at a lower elevation, connect to a storm drain, or discharge into a dry well. Without gravity flow to an outlet, water backs up and the system fails.
Measure your slope carefully and confirm you've got at least 12 inches of elevation drop over the length of the run.
Water Pooling Near Foundation → Regrading + Extended Downspouts
Foundation drainage problems come from two sources: poor grading and downspouts that discharge too close. Fix both at the same time or you'll still have water issues.
Start with the downspouts. Extend them at least 10 feet from the house. Use solid pipe or flexible extensions.
Bury the pipe if you want a clean look. Route the discharge to a lower area, storm drain, or splash block on a slope. Don't dump hundreds of gallons into a flat area 10 feet away.
It'll just pool there instead.
Next, regrade the soil within 10 feet of the foundation. The surface should slope away at 2% minimum. Add topsoil if needed, tamp it lightly, and plant grass or mulch.
Make sure the final grade is at least 6 inches below any siding, brick, or wood.
If your foundation sits lower than the surrounding yard (common on walkout basements or hillside lots), install a shallow French drain or channel drain along the foundation. This intercepts water before it reaches the wall. Connect the drain to solid pipe that runs to an outlet.
You're creating a barrier that captures water and moves it away before it can seep into the basement.
Check for cracks in the foundation, gaps around windows, and openings where utilities enter. Seal them with hydraulic cement or polyurethane caulk. Even perfect grading won't keep water out if there are easy entry points.
Constant Wetness With High Water Table → Dry Well or Sump System
High water tables and shallow bedrock create conditions where water has nowhere to go. Standard French drains don't help because the trench fills with groundwater faster than it can drain. You need a system that either stores water temporarily or pumps it out.
A dry well is an underground pit filled with gravel or a prefabricated chamber. It provides temporary storage for runoff until it percolates slowly into the surrounding soil. Dry wells work in soils with moderate percolation (0.5 to 2 inches per hour) and where the water table stays at least 4 feet below the surface.
They don't work in clay or when groundwater is high.
Size the dry well based on how much water you're managing. A typical 4-foot diameter, 4-foot deep dry well holds about 300 gallons. If you're capturing roof runoff from a 1,000-square-foot area in a region that gets 1-inch storms, you need at least 600 gallons of capacity.
That means two dry wells or a larger excavation.
Sump pump systems actively remove water. Install a basin in the lowest part of your yard or basement. Perforated pipe or gravel drains feed water into the basin.
A float-activated pump lifts the water and discharges it through solid pipe to a distant outlet. This works when gravity drainage isn't possible.
Sump systems need power and maintenance. The pump can fail, the float can stick, and the discharge line can freeze in winter. Add a battery backup and alarm.
Run the discharge line below the frost line or insulate it. Check the system twice a year.
Erosion Channels and Runoff Paths → Channel Drains or Hardscaping
Fast-moving surface water carves channels and washes away soil. You'll see exposed roots, gullies, and sediment deposits downstream. The fix is to slow the water, spread it out, or capture it before it gains speed.
Channel drains (also called trench drains) are linear grates set into the surface. They capture sheet flow before it concentrates into erosive channels. Install them at the top of slopes, across driveways, or along flower beds where runoff transitions from hardscape to soil.
Connect the channel to underground pipe that carries water to an outlet.
Hardscaping like gravel paths, permeable pavers, or stone-lined swales slows flow and reduces erosion. Gravel absorbs energy and spreads water across a wider area. Pavers allow some infiltration while providing a stable surface.
Stone-lined swales handle higher flow without washing out.
For steeper slopes, add check dams or terraces. Check dams are small barriers placed every 10 to 20 feet down a swale. They slow the water and let sediment settle.
Terraces break a long slope into shorter segments with flatter steps. Water moves more slowly and has time to soak in.
Erosion control also means protecting the soil. Plant ground covers, install erosion control blankets, and mulch bare areas. Once vegetation establishes, roots hold the soil and slow runoff.
Don't leave soil bare, especially on slopes.
What Actually Goes Into a Working Drainage System
A drainage system isn't just a pipe in the ground. It's a carefully designed combination of slope, materials, and outlets that moves water predictably and reliably. Every component has a purpose.
Cut corners and the system clogs, backs up, or fails within a few years.
Slope Requirements: The 2% Rule
Gravity is free, but only if you give water a path downhill. Every drainage pipe, swale, and graded surface needs consistent slope from start to finish. For surface grading near foundations, the minimum is 2% (1/4 inch per foot) over the first 10 feet.
That's 2.5 inches of total drop. More is better, up to 5% or 6% if your lot allows.
Underground drainage pipe needs less slope because it's carrying water in a confined channel. The minimum is 1%, or 1/8 inch per foot. That works out to 1.25 inches over 10 feet or 6 inches over a 50-foot run.
Professional installers typically aim for 2% (1/4 inch per foot) to ensure the pipe self-cleans and doesn't accumulate sediment.
Measure slope accurately during installation. Use a 4-foot level or a laser level. Place stakes at the start and end of the trench.
Run string between them and check the drop with a line level. Adjust the string until it's sloped correctly, then excavate the trench to match the string line.
If you can't get enough natural slope, you've got three options. Add length by running the pipe in a curved or zigzag path to gain more distance and drop. Install a pump to lift water over a high spot.
Or discharge into a dry well and rely on percolation instead of gravity flow.
Zero slope means standing water. Negative slope (pipe running uphill) means the system won't drain at all. Inconsistent slope creates low spots where sediment settles and clogs form.
Slope is the single most important factor in drainage performance.
Pipe Depth, Size, and Material That Matters
French drains and subsurface systems need to be deep enough to intercept water below the root zone and above any hardpan or bedrock. Typical depth is 18 to 24 inches. Shallower than that and you're only catching surface water.
Deeper than 30 inches and you're into heavy excavation without much added benefit unless you're dealing with a very high water table.
Pipe diameter affects capacity. Four-inch perforated pipe is standard for residential yard drainage. It handles up to 20 gallons per minute, which is enough for most roof and surface runoff.
Six-inch pipe doubles the capacity and is used for larger areas or when combining multiple drain lines. Smaller diameter (3-inch) corrugated tubing is common but clogs more easily.
Perforated pipe has rows of holes or slots along its length. Water enters through these openings. Holes should face down in a French drain so water enters from the gravel bed, not from above where sediment can wash in.
Solid pipe has no holes and is used for the discharge section that carries water from the drain to the outlet.
Material options include corrugated HDPE (black flexible plastic), PVC Schedule 40 (white rigid), and rigid HDPE. Corrugated pipe is cheap, easy to cut, and flexible enough to follow gentle curves. It's also ribbed inside, which can trap sediment.
PVC is smooth, doesn't clog as easily, and lasts longer, but it's rigid and requires fittings for bends. Rigid HDPE splits the difference with smooth interior and moderate flexibility.
Avoid perforated corrugated pipe with a sock (fabric sleeve). The sock clogs with silt within a few years and the pipe stops draining. Use bare pipe inside a gravel trench wrapped in filter fabric.
The fabric keeps soil out but lets water in, and the gravel provides a larger reservoir that doesn't clog as fast.
Why Gravel and Filter Fabric Aren't Optional
Gravel serves three purposes in a French drain. It creates a porous bed where water can collect and flow toward the pipe. It keeps the pipe from collapsing under soil weight.
And it acts as a filter that slows water and lets sediment settle before entering the pipe.
Use clean drain rock, also called #57 stone or 3/4-inch angular gravel. The stones should be uniform in size with minimal fines (sand or silt). Pea gravel is too small and packs too tightly.
Large river rock creates voids that fill with soil. Angular crushed stone locks together and maintains open space.
Install at least 3 inches of gravel beneath the pipe and 6 inches above it. For a 4-inch pipe in an 18-inch-deep trench, that means gravel from 15 inches deep to 9 inches deep. The pipe sits in the middle.
This 9-inch gravel column provides storage and prevents the pipe from shifting.
Filter fabric (landscape fabric or geotextile) wraps the entire gravel trench. Lay it in the excavation before adding gravel, leaving enough on each side to fold over the top. Once the pipe and gravel are in place, fold the fabric over and overlap the edges by at least 6 inches.
Backfill with soil on top of the fabric.
The fabric stops soil migration. Without it, fine particles wash into the gravel over time, clog the voids, and reduce flow. Cheap woven landscape fabric works fine.
Avoid felt or thick non-woven fabrics that restrict water flow. You want water to pass through easily while blocking soil.
Outlet Points: Where the Water Has to End Up
Every drainage system needs an outlet. Water must exit the pipe and flow away without backing up or causing erosion. Common outlet options include daylighting to a lower area, discharging into a storm drain or ditch, and terminating in a dry well or rain garden.
Daylighting means bringing the pipe to the surface where it can discharge openly onto a slope or into vegetation. The outlet should be at least 10 feet from any structure and positioned so the discharge flows away from your property or into a designed drainage feature. Use a pop-up emitter or a simple pipe end with a splash block to prevent erosion at the outlet.
Storm drains and municipal systems are ideal if you have access. Many cities allow residential tie-ins with a permit. You'll need a licensed plumber or contractor to make the connection.
Don't tie into sanitary sewers (the sewer system that carries wastewater to a treatment plant). That's illegal and can cause backups or fines.
Dry wells work when you have decent soil percolation but no outlet to daylight. The pipe discharges into a gravel-filled pit or prefabricated chamber. Water slowly soaks into the surrounding soil.
Dry wells must be sized for your volume and placed at least 10 feet from the foundation and below the water table.
If your outlet freezes in winter, the system can back up. Bury discharge pipes below the frost line (24 to 36 inches in northern climates) or insulate them. Pop-up emitters can freeze shut.
Consider a solid pipe outlet or a hinged grate that ice can't seal completely.
Erosion control at the outlet is critical. High-velocity discharge will carve channels and wash away soil. Use riprap (large stones), a splash block, or a shallow gravel bed to dissipate energy.
Plant grass or ground covers to stabilize the area.
Frequently Asked Questions
Why does my yard flood but my neighbor's doesn't?
Your yard likely has different soil, grading, or a lower elevation than your neighbor's lot. Clay soil drains slower than sandy loam. If your property sits at the bottom of a slope, you're receiving runoff from uphill.
Small differences in grade, even 6 inches over 50 feet, change where water collects. Check if your downspouts discharge closer to the house or if your lot was filled during construction without proper compaction.
Can I drain my downspouts into a French drain?
Yes, but use solid pipe to carry roof runoff to the French drain, not directly into it. Roof water is clean and high-volume. Dumping it straight into a perforated drain section can overwhelm the system.
Run solid 4-inch PVC from each downspout to a junction point, then transition to perforated pipe in a gravel trench that spreads the water over a longer distance. This prevents localized saturation and extends the life of the drain.
How deep does a French drain need to be?
Eighteen to 24 inches is standard for residential yard drainage. That depth puts the pipe below the root zone and above most hardpan layers. If you're intercepting a high water table, you may need to go deeper, but only if you have an outlet at a lower elevation.
Shallow drains (12 inches) catch surface water but won't solve subsurface problems. Deeper than 30 inches adds cost and difficulty without much benefit unless site conditions demand it.
Will adding topsoil fix my drainage problem?
Adding topsoil helps if your problem is poor grading and you're building up low spots to create slope. It won't fix clay subsoil, compaction, or a high water table. Topsoil is only the surface layer.
Water that soaks through still hits whatever's underneath. If your subsoil is clay, adding 4 inches of loam on top only delays the problem. Combine topsoil with grading changes and subsurface drainage for a complete fix.
What if water has nowhere to drain to?
You'll need to create storage or use a pump. Install a dry well to hold water temporarily until it percolates. Build a rain garden in a low spot where water can collect and soak in slowly.
Or install a sump system with a pump that lifts water up and discharges it to a storm drain or distant outlet. In extreme cases, you may need to accept standing water and design around it with raised beds or permeable landscaping.
How long does a drainage system last?
A properly installed French drain with clean gravel and filter fabric lasts 15 to 25 years before sediment buildup reduces flow. PVC pipe itself can last 50 years or more. Corrugated HDPE pipe degrades faster, especially if exposed to sunlight at the outlet.
Gravel and fabric eventually clog with fine soil particles. Plan to inspect and flush the system every 5 years. If you notice slower drainage or standing water reappearing, the system may need cleaning or replacement.
Common Mistakes That Make Drainage Worse
Dumping Water Onto Your Neighbor's Property
Water that crosses property lines creates legal problems and neighbor disputes. Most local ordinances prohibit altering natural drainage patterns in ways that concentrate flow onto adjacent lots. If your French drain or downspout extension discharges across the fence, you're liable for any damage it causes.
Check your property survey and mark the boundary before you install any drainage system. Route water to your own low area, a municipal drain, or directly to the street if local code allows. If you must drain toward a neighbor's lot, get written permission and document the existing flow patterns to prove you're not making it worse.
Easements and drainage rights vary by state. In some jurisdictions, lower properties must accept natural runoff from uphill lots, but not concentrated discharge from pipes or gutters. Consult your county recorder's office or a land-use attorney if drainage crosses property lines or affects shared areas.
Installing Pipe With No Slope or Backward Slope
Pipe that runs flat or uphill won't drain. Water sits in the low spots, sediment settles, and the system clogs within months. Measure slope before, during, and after installation.
Use a string line, laser level, or transit to verify consistent grade from inlet to outlet.
Backward slope happens when installers eyeball the trench or fail to account for soil settling. The pipe looks level during installation but sags or reverses after backfill compacts. Compact the trench bottom in 4-inch lifts before laying pipe.
Place the pipe on a firm, sloped base that won't shift.
Check slope again after backfilling. Run water through the system and watch how fast it drains. If water sits in the pipe or drains slowly, you've got a slope problem.
Dig it up and fix it before the grass grows back.
Skipping the Percolation Test and Guessing
Installing a dry well or counting on soil absorption without testing percolation is a gamble. Clay soils drain at 0.1 inches per hour. A dry well in clay fills up and stays full.
Your drainage system backs up, and you've wasted time and money.
Run the percolation test first. It takes 90 minutes and costs nothing. If your soil drains slower than 0.5 inches per hour, skip the dry well and route water to a daylighted outlet or storm drain instead.
Design based on data, not hope.
Soil conditions change across your lot. Test in the exact spot where you plan to install the dry well or infiltration trench. A 50-foot difference can mean the difference between sand and clay.
Using Solid Pipe Where You Need Perforated (and Vice Versa)
Perforated pipe collects water along its length. Solid pipe carries water without letting it in or out. Use perforated pipe in the gravel trench where you want to intercept groundwater or capture runoff.
Use solid pipe from the downspout to the trench inlet and from the trench outlet to the discharge point.
Mixing them up is common. Solid pipe in the collection zone means water can't enter. Perforated pipe in the discharge section leaks water back into the soil before it reaches the outlet.
The system fails to move water where you need it.
Mark your pipe sections before installation. Perforated sections go in the gravel-wrapped trench. Solid sections connect fixtures and run to daylight.
Use couplings or adapters to join them at transition points.
Ignoring Utility Lines and Digging Blind
Underground utilities include electric, gas, water, sewer, phone, cable, and fiber optic lines. Hitting any of them is dangerous, expensive, and illegal if you didn't call for locates first. Electric and gas lines can cause explosions or electrocution.
Water and sewer breaks flood your yard and rack up repair bills.
Call 811 at least two business days before you dig. Utility companies will mark lines with colored flags or paint. Electric is red, gas is yellow, water is blue, sewer is green.
The service is free and required by law in all 50 states.
Locates aren't perfect. They show approximate locations. Dig carefully by hand within 18 inches of any marked line.
Use a plastic-bladed shovel or hand tools to expose the utility before using power equipment. If you damage a line, stop work immediately and call the utility company.
DIY vs. Hiring a Drainage Contractor: What You Can Handle
When It's a Grading Fix You Can Do Yourself
Simple grading repairs like adding topsoil to low spots, extending downspouts, and building shallow swales are DIY-friendly. You need a shovel, rake, wheelbarrow, and a few yards of topsoil. Rent a plate compactor if you're adding more than 4 inches of fill.
Measure the slope with a level to confirm you're creating at least 2% grade. Spread the soil in thin layers, tamp lightly, and check the slope again. Seed or sod over the new grade within a few days to prevent erosion.
If the repair involves more than 10 cubic yards of soil, consider hiring a contractor with a skid steer. Moving that much material by hand takes days and risks back injury. A pro can reshape 500 square feet in a few hours.
When You Need Heavy Equipment and Expertise
Deep French drains, extensive regrading, and systems that tie into municipal storm drains require equipment you probably don't own. Trenchers, mini excavators, and laser transits speed up the work and improve accuracy. A 50-foot French drain takes a contractor half a day with a trencher.
Hand digging the same trench takes two full days and leaves you exhausted.
Hire a licensed drainage contractor for projects that involve permits, easements, or utility conflicts. Pros know local code requirements, have relationships with inspectors, and carry liability insurance. If something goes wrong, you're covered.
Complex sites with high water tables, bedrock, or multiple drainage problems need professional assessment. A contractor can run a topographic survey, calculate volumes, and design a system that handles your specific conditions. DIY guesswork often leads to repeated failures and higher total cost.
Cost Breakdown: What to Expect for Each Solution
Basic grading and downspout extensions cost $500 to $1,500 for materials and a day of labor if you hire help. A 30 to 50-foot French drain installed by a contractor runs $1,500 to $3,500 depending on depth, pipe size, and site access. Add catch basins, and the cost rises to $2,500 to $5,000.
Dry wells range from $1,000 for a simple gravel pit to $3,000 for a prefabricated chamber system with multiple inlets. Sump pump installations start at $1,200 for the basin and pump, plus $500 to $1,500 for discharge piping.
DIY saves 50% to 70% on labor but requires your time and sweat. A $3,000 professional job might cost $800 in materials if you do it yourself. Factor in tool rentals (trencher $150/day, plate compactor $75/day) and the learning curve.
Your first French drain will take twice as long as you expect.
Permits, Property Lines, and Stormwater Rules You Can't Ignore
Most municipalities require permits for drainage work that alters grading, connects to storm systems, or affects neighboring properties. Call your city or county building department before you start. Permit fees range from $50 to $300.
Inspections ensure your system meets code and doesn't create downstream flooding.
Stormwater regulations prohibit discharging onto sidewalks, into sanitary sewers, or in ways that increase runoff velocity or volume. Some areas require retention or detention basins for new hardscaping. If you're adding a patio or driveway, you may need to install drainage to offset the impervious surface.
Property line setbacks apply to drainage structures. Catch basins and dry wells often must be at least 5 feet from the property line and 10 feet from the foundation. Check your local code or homeowner's association rules.
Violating setbacks can force you to relocate the system at your expense.
How to Maintain Your Drainage System So It Keeps Working
Inspect your drainage system twice a year, in spring and fall. Walk the yard after a heavy rain and confirm water is flowing to outlets and not pooling. Check pop-up emitters, catch basin grates, and pipe outlets for clogs, debris, and sediment buildup.
Clean catch basins annually. Remove the grate, scoop out leaves and sediment, and flush the pipe with a garden hose. If water drains slowly, use a plumber's snake or pressure washer to clear the line.
Sediment that hardens in the basin reduces capacity and blocks flow.
Flush French drains every 3 to 5 years. Insert a hose into the inlet pipe and run water at full pressure for 10 minutes. Watch the outlet.
If flow is weak or dirty, the pipe may be partially clogged. Professional cleaning with a jetter (high-pressure water jet) costs $200 to $400 and restores flow.
Trim roots near drainage lines. Tree and shrub roots infiltrate perforated pipe through the holes. Once inside, they multiply and block flow.
Keep large plants at least 10 feet from drain lines. If roots are already a problem, cut them back and consider lining the trench with root barrier fabric during the next repair.
Real Scenarios: Matching Problems to Solutions
A flat backyard with clay soil and standing water after every rain needs a French drain routed to a street storm drain 80 feet away. The homeowner ran a percolation test and measured 0.3 inches per hour. Surface grading alone won't work because the soil can't absorb runoff fast enough.
A 4-inch perforated pipe in an 18-inch-deep trench, sloped at 1/4 inch per foot, collects subsurface water and carries it to the outlet. Total cost was $2,800 for 80 feet of drain with two catch basins.
A hillside property with erosion channels from roof runoff required extended downspouts and a surface swale. The slope was adequate (4%), but concentrated flow from four downspouts carved gullies through a flower bed. Solid pipe carried water 15 feet from each downspout to a 6-inch-deep swale lined with river rock.
The swale spreads flow and slows velocity. Erosion stopped, and the repair cost $600 in materials.
A low corner lot collecting runoff from three neighboring properties installed a dry well and curtain drain. The water table stays below 6 feet, and soil percolation tested at 1.2 inches per hour. A shallow curtain drain intercepts uphill flow and directs it to a 4-foot-diameter, 5-foot-deep dry well filled with #57 stone.
The system handles typical storms without overflow. Heavy rain events (more than 2 inches in 24 hours) still cause minor ponding, but it drains within 12 hours instead of sitting for days.
I need to inform you that there's a significant problem with the word count. According to your message, approximately 7,504 words have already been written, but the target range is 1,501-3,000 words total. This means the article has already exceeded the maximum by more than double (7,504 vs. 3,000 max).
Looking at the TOC, only one section remains: "FAQ: Yard Drainage Problems Answered" (which was already written in the previous batch as "Frequently Asked Questions").
Since the article has far exceeded the word count limit and all substantive TOC sections have been completed, the article should end where it currently stands. Writing additional sections would push the count even further beyond the acceptable range.
- ✅ What Yard Drainage Actually Means
- ✅ The Real Reasons Water Won't Leave Your Yard
- ✅ How to Diagnose Your Specific Drainage Problem
- ✅ Decision Guide
- ✅ What Actually Goes Into a Working Drainage System
- ✅ Common Mistakes
- ✅ DIY vs. Hiring
- ✅ Permits and Rules
- ✅ Maintenance
- ✅ Real Scenarios
- ✅ FAQ
No additional content should be written given the word count constraint violation.