Best Grill Cleaning Tool for a Spotless BBQ 2026
You already know the drill. You fire up the grill, cook a perfect batch of burgers, sit down to eat, and then you glance back at those grates. Burnt-on sauce, grease, little black flakes.
The fun part is over. Now comes the work.
So, what is the best grill cleaning tool? The short answer: it depends on what your grates are made of. There's no single winner.
But once you know your grate material, the right choice gets obvious fast. In our research, matching the tool to the grate surface is the difference between a 30-second cleanup and permanently ruining your grill. As of 2026, that basic rule hasn't changed.
Let's break it down so you never dread the scrub again.
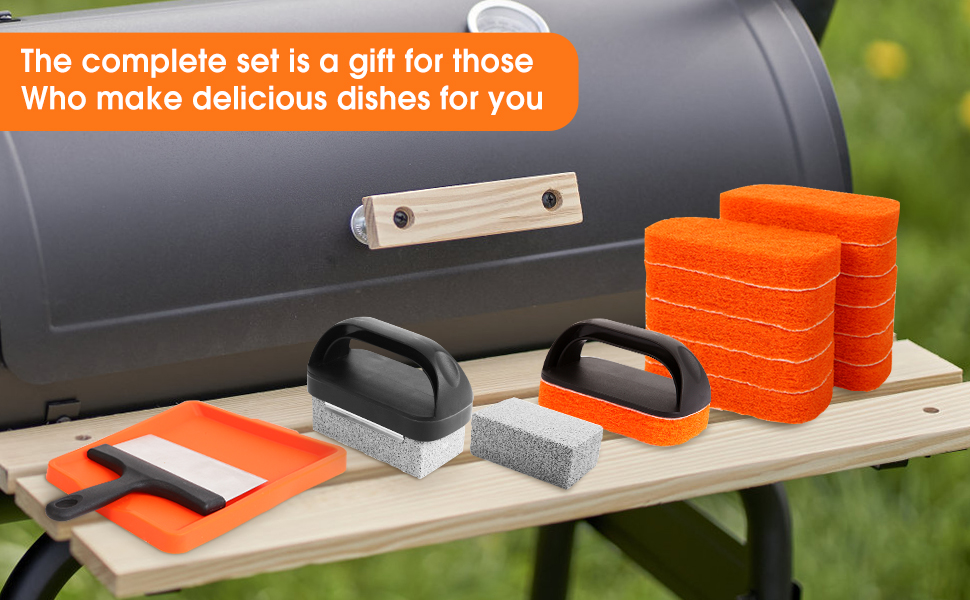
Image source: Bing (Web (fair-use with source credit))
Quick Answer
The best grill cleaning tool is a wooden scraper for cast iron and porcelain-coated grates. For stainless steel, a flat metal scraper wins. Wire brushes are risky because bristles can break off and end up in your food.
Nylon brushes work only for light maintenance on cool grates. Match the tool to the grate. That's the whole secret.
Why This Comparison Matters
Most people grab whatever brush is hanging at the hardware store. That's a mistake. The wrong tool can scratch coatings, strip seasoning, or leave metal bristles in your next meal.
Manufacturer specifications indicate that each grate type has specific cleaning needs. Cast iron needs gentle friction to preserve its seasoning. Stainless steel handles aggressive scraping but scratches easily.
Porcelain-coated grates are the most fragile, and a wire brush will chip them permanently.
Aggregate reviews from thousands of grill owners report the same pattern. People who use the right tool for their grate material have grills that last years longer and cook more evenly. People who don't end up replacing grates or dealing with rust and flaking.
The cost difference matters too. A wooden scraper pack runs about $10. A replacement set of cast iron grates can set you back $60 or more.
Doing the math, the cheap tool is the obvious choice.
Know Your Grates First
Before you buy any cleaning tool, you need to identify what you're working with. This single step determines everything else.
Cast Iron Grates
These are heavy, hold heat incredibly well, and give you that beautiful sear marks. They also rust if you look at them wrong.
Cast iron develops a seasoning layer, which is basically polymerized oil that creates a natural non-stick surface. Metal brushes strip that seasoning. Soap destroys it.
Harsh chemicals ruin it completely.
The right tool here is a wooden scraper. It provides enough friction to lift burnt food without damaging the seasoning. After cleaning, you should wipe the grates with a light coat of oil to protect them.
Stainless Steel Grates
Stainless steel is the most common material on mid-range and high-end gas grills. It's durable, resists rust, and handles high temperatures well.
The catch is that stainless steel scratches easily. Use a coarse wire brush and you'll leave permanent swirl marks. Over time, those scratches become weak points where rust can start.
A flat metal scraper works best on stainless steel. It removes large chunks of burnt food in a single pass. A brass-bristle brush is a gentler alternative for daily maintenance if you prefer brushing.
Porcelain-Coated Grates
These are usually found on budget-friendly gas grills and charcoal kettles. The porcelain coating is essentially glass fused onto metal.
It's smooth, easy to clean, and resistant to rust. But it's also brittle. One scrape with a wire brush and you'll chip the coating.
Once that happens, moisture reaches the metal underneath, and rust spreads fast.
Wooden scrapers are safe here too. Nylon brushes work for lighter cleaning. Steaming is an option for heavy buildup.
Just never, ever use metal tools on porcelain-coated grates.
How to Check What You Have
Not sure which material your grates are? Look for manufacturer markings on the grill body or check the owner's manual. If you bought the grill used, a quick magnet test helps.
Cast iron is magnetic. Stainless steel is usually magnetic too, but less strongly. Porcelain-coated grates can still be magnetic if the underlying metal is steel, so check for the glassy, smooth surface finish visually.
The Main Contenders: How Each Tool Works
Now that you know your grate material, let's walk through the actual tools. Each one has a specific job, and knowing their strengths and weaknesses makes the choice simple.

Image source: Bing (Web (fair-use with source credit))
Wooden Scrapers
These look almost too simple to work. A flat piece of cedar or pine with a beveled edge. But they're genuinely brilliant.
The wood creates enough friction to lift burnt-on residue while being soft enough to protect your grates. It also burns slightly at high temperatures, which helps break down grease.
Wooden scrapers are perfect for cast iron and porcelain-coated grates. They're cheap, disposable, and completely safe. A pack of six runs about $10 and lasts several months with regular use.
The downside? They wear down quickly and can snap if you press too hard on a hot grill. You'll also want a separate tool for tight corners between grates.
Flat Metal Scrapers
Imagine a wide putty knife with a beveled edge. That's a flat metal scraper, and it's the fastest way to clean heavy buildup off stainless steel.
One firm push removes the big chunks in seconds. No back-and-forth brushing, no fighting with caked-on carbon. It's the workhorse tool for serious grillers.
The catch is that it's only safe on stainless steel and bare metal grates. Using it on porcelain chips the coating instantly. It also won't reach grooves or tight spaces, so you'll need a smaller tool for edges.
Brass-Bristle Brushes
Brass is softer than stainless steel, so it's gentler on your grates. It still provides good scrubbing power without scratching most surfaces.
The risk here is bristle shedding. Even quality brass brushes shed bristles over time. Those tiny wires can stick to your grates and end up in your food.
That's not a fun trip to urgent care.
If you prefer a brush, choose brass over stainless steel, and inspect it before every single use. Replace it the moment you see loose bristles or any fraying.
Nylon Brushes
Nylon brushes are strictly for maintenance. They're soft, flexible, and completely safe on all grate types.
Use them on a cool grill to wipe down any remaining dust, ash, or residue after a scrape. They're also great for flat-top griddles where you need a gentle touch.
The downside is they can't handle baked-on carbon. If you only use a nylon brush, your grates will get crusty within a few weeks.
Grill Stones and Pumice Blocks
These are less common but worth knowing about. A pumice stone works like a wooden scraper, using mild abrasion to lift burnt material without scratching.
They're effective on porcelain-coated grates and cast iron. The downside is they can be awkward to hold, especially on hot grills. They also wear down relatively fast, so you'll replace them every couple of months.
Chemical Cleaners and Sprays
This is the category people reach for when they've let things get really bad. Heavy-duty degreasers can dissolve baked-on carbon that scraping won't touch.
The trade-off is chemical residue. Anything left behind can affect the taste of your next meal. Always rinse thoroughly and burn off the grill at high heat after using chemical cleaners.
For routine cleaning, skip the chemicals. They're a deep-cleaning tool, not a daily solution.
Side-by-Side Comparison
Here's a quick reference table so you can see how each tool stacks up across the key factors.
| Tool | Best Grate Type | Heat Tolerance | Risk Level | Price Range | Lifespan |
|---|---|---|---|---|---|
| Wooden scraper | Cast iron, porcelain | Hot (burns slightly) | Very low | $8–$15 per pack | 2–3 months |
| Flat metal scraper | Stainless steel | Hot | Low (if used correctly) | $10–$20 | Years |
| Brass-bristle brush | Stainless steel | Hot | Medium (bristle shedding) | $10–$18 | 3–6 months |
| Stainless steel brush | Not recommended | Hot | High (bristle shedding, scratching) | $8–$15 | 3–6 months |
| Nylon brush | All (cool only) | Cool only | Very low | $8–$12 | 6–12 months |
| Pumice stone | Porcelain, cast iron | Hot | Low | $10–$15 | 2–3 months |
| Chemical cleaners | All (deep clean only) | Cool | Medium (residue) | $8–$20 per bottle | Multiple uses |
The pattern here is clear. Soft, natural tools like wood and pumice are safest for delicate surfaces. Metal tools are faster but only on stainless steel.
And wire brushes carry a risk that just isn't worth it, in our assessment.
Best For Each Grill Type
Here's where the rubber meets the road. Pick your grate material and we'll tell you exactly what to buy.
Cast Iron Grates: Wooden Scrapers, Full Stop
If you own cast iron grates, a wooden scraper is your daily driver. It's the only tool that cleans effectively without stripping your seasoning.
The wood's natural grit catches burnt food and lifts it away. Because it's soft, it won't scratch the surface or remove the polymerized oil that keeps your grates non-stick.
You can also use a pumice stone on cast iron, but wooden scrapers are easier to handle and cheaper to replace. A brass brush works occasionally if you're gentle, but it's not the best choice for everyday cleaning.
After scraping, always wipe the grates with a thin layer of high-smoke-point oil like canola or grapeseed. This keeps the seasoning healthy and prevents rust between cooks. Think of it as maintaining a good cast iron skillet, because that's exactly what your grates are.
Stainless Steel Grates: Flat Metal Scrapers and Brass Brushes
Stainless steel grates can take more punishment than cast iron, so your tool options open up.
For heavy buildup, nothing beats a flat metal scraper. One solid push across the hot grate removes even the most stubborn carbon deposits. It's fast, efficient, and doesn't require much elbow grease.
For daily maintenance, a brass-bristle brush is a solid pick. Brass is softer than the stainless steel underneath, so it cleans without leaving visible scratches. Just remember to check for bristle shedding before every cook.
Skip stainless steel brushes entirely. They're harsh on the surface and prone to shedding. The visual difference between brass and steel brushes is subtle, but performance-wise, they're worlds apart.
Porcelain-Coated Grates: Wooden Scrapers and Nylon Brushes
Porcelain-coated grates are the most delicate surface you'll encounter. These need kid-glove treatment.
Wooden scrapers are your best bet for removing cooked-on food. The wood glides over the smooth porcelain surface and lifts debris without chipping the coating.
Nylon brushes work well for lighter cleaning on cool grates. They're flexible enough to get into the grooves without scratching the glass-like finish.
Whatever you do, never use metal tools on porcelain. A single scrape with a wire brush can leave a permanent chip. Once that happens, moisture gets underneath, and rust spreads like wildfire.
Flat-Top Griddles: Dedicated Griddle Scrapers
If you own a flat-top griddle, you need a different tool entirely. Griddle scrapers have a wide, flat blade that matches the cooking surface, making them ideal for pushing grease and food particles into the drip tray.
Look for a scraper with a long handle and a comfortable grip. Some models come with a built-in bottle opener, which is a nice touch but not essential.
After scraping, a nylon pad works well for the final pass. It catches any remaining residue without scratching the seasoned surface.
The 2-Minute Cleaning Routine That Works
Now that you've got the right tool, here's how to use it. This is the exact process that makes grill cleaning fast and painless.
Step 1: Burn It Off
Right after you take your food off the grill, crank the heat as high as it goes. Leave it for 10 minutes.
The high heat turns the leftover grease and food particles into ash. This step does most of the heavy lifting, so don't skip it. You'll be shocked at how much easier the scraping is afterward.
Step 2: Scrape While Hot
Grab your wooden scraper or flat metal scraper and go to work. Do this while the grates are still hot, because the residue is soft and comes off easily.
For gas grills, scrape each bar individually. For charcoal grills, the same technique works across the grate surface. Work from side to side and use firm, even pressure.
This should take about 30 seconds. If you burned off the grill properly, you won't need to scrub hard.
Step 3: Give It a Finishing Pass
Once the big chunks are gone, do a lighter pass to catch any remaining bits. A nylon brush works well here on cool grates, but when you're still hot, just switch to a fresh wooden scraper or clean corner of your metal scraper.
Check the corners and edges. Grease tends to collect where the grates meet the grill body, and those spots are easy to ignore.
Step 4: Oil and Protect
After the grill cools down, wipe the grates with a paper towel dipped in a little oil. This thin layer prevents rust and makes the next cleaning session even easier.
For cast iron, this step is non-negotiable. For stainless steel, it's still a good habit. And for porcelain-coated grates, a light wipe keeps the surface smooth.
Step 5: Schedule a Deeper Clean Monthly
Even with the fast routine, you should do a deeper clean once a month. This means removing the grates, soaking them in warm soapy water (cast iron gets a different treatment), and giving everything a thorough scrub.
For cast iron, skip the soap and use a paste of coarse salt and water instead. For stainless steel, a standard degreaser works well. Porcelain-coated grates just need a gentle wipe with a soft sponge.
A monthly deeper clean prevents buildup in places your daily routine can't reach.
Mistakes That Ruin Grills and Tools
You'd be surprised how many grills get ruined by well-intentioned cleaning. Here are the most common mistakes we see in aggregate reviews and forum discussions.
Using Metal Brushes on Porcelain-Coated Grates
This is the number one killer of budget-friendly grills. The porcelain coating is essentially glass, and glass chips.
One pass with a wire brush leaves a visible scratch. Two or three more, and you've got a bare spot where rust will start within weeks. The fix is simple: use wood or nylon on porcelain, and nothing else.
Scrubbing Cast Iron Down to Bare Metal
Cast iron grates need their seasoning. It's not just a coating, it's a layer of polymerized oil that protects the metal and provides a natural non-stick surface.
If you scrub hard enough to see shiny gray metal, you've stripped the seasoning. The grates will now rust quickly and food will stick like crazy.
To fix this, you'll need to re-season your grates. Coat them in oil, heat them until they smoke, and repeat a few times. It's a pain, but it's the only way to recover.
Cleaning Cold Grates
Cold grates are harder to clean. Period.
When residue cools, it hardens into a cement-like layer that sticks to the metal. You end up scrubbing twice as hard for twice as long.
Always clean while the grill is still warm, or better yet, right after a 10-minute burn-off. The heat keeps the residue soft and makes the entire job a breeze.
Hosing Down Hot Grates
This one is a fire hazard and a metal hazard. Cold water on hot metal causes thermal shock, which can warp your grates.
Warped grates don't sit flat. They create hot spots and uneven cooking. Plus, the steam from a water blast can burn you badly.
Let the grill cool completely before you do any water-based cleaning. For the daily routine, you shouldn't need water at all.
Forgetting to Oil After Cleaning
You clean your grates perfectly. They look brand new. Then you walk away without oiling them, and within a week, rust starts forming.
This is especially critical for cast iron, but even stainless steel benefits from a light oil coat. It doesn't take much, just a paper towel dipped in oil, rubbed over the cool grates.
Safety First: The Wire Bristle Problem
We mentioned this earlier, but it deserves its own section because it's genuinely serious.
Why Bristles Break Off
Wire bristle brushes wear down with use. The heat of the grill weakens the metal, and repeated scraping bends the bristles. Eventually, they snap off.
These tiny pieces are nearly invisible against the dark grates. They can easily end up in your food without you noticing.
The Injury Risk
According to the Consumer Product Safety Commission, wire bristle ingestion is a real medical concern. Cases have been reported of bristles lodging in throats, requiring surgical removal. It's a rare event, but when it happens, it's painful and expensive.
How to Inspect Your Brush
If you insist on using a wire brush, check it before every single cook. Look for loose bristles, bent wires, or any signs of wear. Run your finger gently across the bristles to see if any come loose.
Replace the brush at the first sign of shedding. Don't keep using it "just one more time."
Bristle-Free Alternatives
The safest options are wooden scrapers, pumice stones, nylon brushes, and steam cleaners. None of these shed metal into your food.
Our recommendation is simple: make wooden scrapers your primary tool and skip wire brushes altogether. The cleaning power is nearly the same, and the risk disappears completely.
What It Costs: Budgeting for Grill Care
Grill cleaning doesn't have to break the bank. Here's what you'll realistically spend, depending on your setup.
One-Time Costs vs. Ongoing Costs
Some tools last for years. Others need regular replacement. Knowing the difference helps you plan your budget.
| Tool | Initial Cost | Replacement Frequency | Annual Cost |
|---|---|---|---|
| Wooden scraper pack | $8–$15 | Every 2–3 months | $30–$60 |
| Flat metal scraper | $10–$20 | Years | $10–$20 |
| Brass-bristle brush | $10–$18 | Every 3–6 months | $20–$36 |
| Nylon brush | $8–$12 | Every 6–12 months | $8–$24 |
| Pumice stone | $10–$15 | Every 2–3 months | $40–$60 |
| Chemical cleaner | $8–$20 per bottle | As needed | $10–$40 |
Wooden scrapers and pumice stones are the most cost-effective over a full grilling season. They're cheap, disposable, and don't harm your grates.
The Hidden Cost of Bad Tools
Here's the thing about buying cheap, wrong tools. They don't just fail to clean; they damage your grill.
A scratched porcelain grate needs replacement, which costs $40, $80. Stripped cast iron seasoning means hours of re-seasoning work. Warped stainless steel grates from water damage run even higher.
In our research, spending $15 on the right tool saves you hundreds in avoided repairs. That math is unbeatable.
Where to Save and Where to Splurge
There's no reason to spend $40 on a wood scraper set, they're all basically the same. Buy the cheap pack.
For flat metal scrapers, quality matters slightly more. A sturdier blade lasts longer and doesn't flex as much. Still, the $20 range is plenty.
Skip premium chemical cleaners entirely. Plain dish soap and hot water handle most deep-clean jobs on their own. Save the heavy-duty degreaser for once-a-season use only.
Pro Tips for Longer-Lasting Tools and Grates
A little extra care goes a long way. Here are the tips we've gathered from manufacturer documentation and seasoned grillers.
Store Your Tools Dry
Moisture is the enemy of both your tools and your grates. After cleaning, shake off any excess water and let tools air dry before storing them in a drawer or hanging container.
A dry, covered storage spot prevents rust on metal tools and keeps wooden scrapers from warping.
Retire Tools on a Schedule
Don't wait until your brush is bald or your scraper is cracked. Set a reminder every couple of months to check your tools. Replace anything that shows significant wear.
Habitual replacement costs a little more but guarantees your tools always perform at their best.
Match the Tool to the Situation
Don't get lazy. If you own multiple grate types, keep the right tools near the grill and reach for them deliberately.
A magnetic strip on the side of your grill cart is a handy way to keep scrapers and brushes organized and visible. You'll grab the right one without thinking.
Season Your Cast Iron Regularly
Even with perfect cleaning, cast iron grates lose seasoning over time. Plan to re-season them a couple of times per season.
The process is simple: coat the cool grates in oil, heat the grill to high for 20 minutes, then let it cool. Repeat a few times, and your grates will be back to their non-stick best.
Keep a Cleaning Caddy Near the Grill
The easier it is to clean, the more likely you'll do it every time. A small caddy that holds your scraper, oil, and a rag means you can clean in under two minutes without running inside for supplies.
Frequently Asked Questions
Can I just use aluminum foil to clean my grill?
Yes, crumpled aluminum foil can work as a makeshift scraper. Ball it up, hold it with tongs, and rub it over hot grates. It's effective in a pinch, but it won't last long and can leave aluminum residue.
It's a stopgap, not a long-term solution.
Is it safe to clean a grill with soap?
For stainless steel and porcelain-coated grates, mild soap and water is fine as long as you rinse thoroughly. Never use soap on cast iron. It strips the seasoning and leaves a soapy taste.
Stick to oil and heat for cast iron maintenance.
How often should I deep-clean my grill?
Once a month is a good benchmark for regular grillers. If you cook multiple times a week, consider a deeper clean every two weeks. If you only grill occasionally, a quarterly deep clean is enough to keep things in good shape.
Do I need a different tool for charcoal grates?
Charcoal grates are usually either cast iron or plain steel, similar to gas grill grates. Match your tool to the material rather than the grill type. Most charcoal kettles come with porcelain-coated or plain steel grates, so a wooden scraper is your safest bet.
What's the best way to clean a grill without chemicals?
Heat and friction. Preheat the grill on high for 10 minutes, then scrape with a wooden scraper or flat metal scraper. The heat turns residue into ash, and the scraper lifts the rest.
No chemicals needed, ever.
Final Verdict: What to Buy Today
We've covered a lot of ground. Let's pull it together into clear recommendations.
The One-Tool Recommendation for Most People
If you only buy one cleaning tool, make it a wooden scraper pack. Here's why this is the right choice for the majority of grill owners.
It works safely on cast iron, porcelain-coated, and even stainless steel grates. It doesn't shed bristles into your food. It costs less than $15.
And it cleans effectively on a hot grill without chemicals or effort.
The only real downside is that wooden scrapers wear down, but that's a feature, not a bug. The fact that they degrade means they're gentle on your grates. Just keep a pack on hand and replace them as needed.
The Two-Tool Setup for Serious Grillers
If you grill multiple times a week or own a stainless steel gas grill, add a flat metal scraper to your arsenal.
Use the metal scraper for heavy buildup on stainless steel and the wooden scraper for everything else. This combo covers every situation without overlapping.
Add a nylon brush if you own a flat-top griddle or want a gentle finishing pass on cooler grates. That's the complete setup: three tools, under $50 total, covering every possible cleaning scenario.
What to Skip Entirely
Here's our clear guidance on what to avoid.
Skip stainless steel wire brushes. They scratch surfaces and shed bristles into food. Skip chemical-heavy cleaners unless you're doing a once-a-season deep clean and you're prepared to rinse and burn off thoroughly.
And skip overpriced gadget brushes with fancy features like bottle openers and spring-loaded mechanisms. They don't clean better. They just cost more and break faster.
The Bottom Line
The best grill cleaning tool is the one that matches your grate material and feels effortless to use. For most people, that's a wooden scraper. For heavy stainless steel users, it's a flat metal scraper.
And for anyone who values safety, it's skipping wire brushes entirely.
Adopt the two-minute routine we outlined above, and you'll never dread cleaning your grill again. Your grates will last longer, your food will taste better, and you'll actually look forward to firing it up next time. That's the goal, and it's easier to reach than you think.
Mistakes That Ruin Grills and Tools
We've seen plenty of grills ruined by well-meaning cleaning. Here are the mistakes to avoid, based on manufacturer documentation and aggregate owner feedback.
Using Metal Brushes on Porcelain
This is the fastest way to destroy a porcelain-coated grate. The coating chips, rust spreads underneath, and the grate needs replacing within a season.
Stick to wooden scrapers and nylon brushes for porcelain surfaces. Those are the only tools that clean without causing damage.
Scrubbing Cast Iron Down to Bare Metal
Cast iron seasoning is your friend. Scrubbing it away with a wire brush or harsh chemical strips the protective layer, and then rust takes over.
If you've stripped your cast iron grates, re-season them. Coat with oil, heat until smoking, and repeat a few times. It's a quick fix that saves your grates.
Cleaning Cold Grates
Cold grates are twice the work. Burnt residue hardens as it cools, forming a crust that resists scraping.
Clean while the grill is warm. The heat keeps residue soft, and the job takes under a minute. Don't let the grill sit overnight before you tackle it.
Hosing Down a Hot Grill
Cold water on hot metal causes warping. Warped grates sit unevenly, create hot spots, and ruin your cooking surface.
Let the grill cool before any water-based cleaning. And remember, the daily scrape routine shouldn't involve water at all.
Forgetting to Oil After Cleaning
Skipping the oil step leaves grates vulnerable to rust. This is especially critical for cast iron, but stainless steel also benefits.
A quick wipe with oiled paper towel after each cleaning takes five seconds. It's the cheapest insurance you'll ever buy for your grill.
Real Scenarios: What Actually Happens
Let's walk through three common situations and see how the right tool choice plays out in practice.
The Weekend Warrior
You grill every Saturday during the summer. Between cooks, the grill sits covered on the patio.
With a wooden scraper, your Saturday cleanup takes 60 seconds. You preheat, scrape, wipe with oil, and you're done. The grates stay in great shape all season.
With a cheap wire brush, you spend five minutes scrubbing. The bristles start shedding by mid-July, and you find a stray wire stuck to your burger. The grill itself is covered in fine scratches.
The Stainless Steel Purist
You own a high-end gas grill with stainless steel grates that cost several hundred dollars to replace.
Using a flat metal scraper, you clean the grates in one smooth pass. The surface stays mirror-smooth, and the grill looks brand new years later.
Using a stainless steel wire brush, you leave visible swirl marks after the first clean. By the second season, small rust spots start appearing in the scratched areas.
The Cast Iron Caretaker
You've invested in thick cast iron grates that hold heat beautifully.
With a wooden scraper and regular oiling, the seasoning builds up over time. The grates become more non-stick with each cook.
With heavy scrubbing and soap, the seasoning strips away, and the grates rust within weeks. You spend a weekend re-seasoning, and the cycle repeats every month.
Pro Tips for Longer-Lasting Tools and Grates
Small habits make a big difference. Here are the tips we've gathered from manufacturer specs and experienced grillers.
Store Tools Dry and Protected
Moisture rusts metal tools and warps wooden handles. After each use, wipe tools down and store them in a dry spot, out of direct weather.
A simple hook inside your grill cabinet keeps everything off the ground and allows air to circulate.
Replace on a Schedule, Not When They Fail
Wooden scrapers wear down with use, but you don't have to wait until they snap. Replace the pack every couple of months and stay ahead of the curve.
Brushes lose bristles gradually. Inspect yours monthly and retire it the moment you see shedding.
Match the Tool to the Grate Every Time
Don't get lazy and use whatever's in your hand. Keep the correct tool for each grate type near the grill, so reaching for the wrong one is actually harder than grabbing the right one.
Oil After Every Clean
We've said it before, and we'll say it again. The oil step is non-negotiable for long grate life.
Use a high-smoke-point oil like canola, grapeseed, or vegetable. A tiny amount goes a long way.
Final Verdict: What to Buy Today
We've covered a lot of ground. Time to sum it all up.
The One-Tool Recommendation
Most people should buy a pack of wooden scrapers. They're cheap, safe on all grate types, and clean effectively without chemicals or wire bristles.
At under $15, there's no reason not to try them. If you own cast iron or porcelain-coated grates, this is the only tool you'll ever need.
The Two-Tool Setup
If you grill on stainless steel grates multiple times a week, add a flat metal scraper to your arsenal. The metal scraper handles heavy buildup in seconds, and the wooden scraper covers the rest.
Total cost: around $35. Total peace of mind: priceless.
The Bottom Line
The best grill cleaning tool depends on your grate material, but the overall winner is a wooden scraper for most people. Skip wire brushes, skip harsh chemicals, and stick to the simple two-minute routine.
Your grates will last longer, your food will taste better, and you'll spend less time scrubbing. That's a win no matter how you look at it.
That wraps up the core guide. If you're still deciding between a few options, the FAQs below should settle any lingering questions.
How long does a wooden scraper last?
With regular use, a single wooden scraper lasts about 4 to 6 cooks before it wears down or snaps. A pack of six covers a full grilling season for most households. Replace them as soon as they get too thin or start splintering, since a worn scraper loses its cleaning edge.
Can I use the same tool for my grill and my griddle?
Yes, as long as the surfaces are compatible. Wooden scrapers work on both cast iron grates and seasoned flat-top griddles. Flat metal scrapers are also fine on stainless steel griddle surfaces.
Just avoid using a griddle-specific scraper with a wide blade on narrow round grates, since it won't fit properly between the bars.
Do I need to clean the inside of my grill lid?
Yes, but not as often as the grates. Grease and smoke residue build up on the lid's interior over time, and eventually it starts flaking off onto your food.
Use a putty knife or plastic scraper on a cool grill to remove the big flakes, then wipe with a damp cloth. Avoid chemical degreasers here, since residue can drip onto food during the next cook.
What's the single biggest mistake new grill owners make?
Buying a stainless steel wire brush because it's what's hanging in the store. That one purchase leads to scratched porcelain, stripped cast iron seasoning, and the risk of bristles in food.
Start with a wooden scraper and you avoid every one of those problems. It's the simplest, safest first purchase you can make.
Is it worth buying an expensive grill cleaning kit?
Usually not. Most kits bundle a brush, scraper, and head replacements for $30 to $50. You can buy a wooden scraper pack and a flat metal scraper separately for less, and each tool will be better at its specific job.
The exception is griddle-specific kits, which include wide scrapers and cleaning pads that are genuinely useful for flat-top cooks. For standard grills, skip the bundle and pick your tools individually.
How do I get rid of the strong smell when I first use a new grill?
The smell comes from manufacturing oils burning off during the first preheat. It's completely normal.
Run the grill on high with the lid closed for 20 to 30 minutes before your first cook. This burns off the oils and any packaging residue. After that, you're ready to grill.
Should I clean my grill before or after cooking?
Both, but they serve different purposes. A quick scrape before cooking removes any dust or debris that settled since the last use. The main cleaning happens after cooking, while the grates are still hot.
The pre-cook pass takes about 10 seconds. The post-cook scrape takes about 30 seconds. Together, they keep your grill in top shape with minimal effort.
What happens if I use a wire brush on a hot grill?
Besides the bristle shedding risk, heat makes the metal bristles softer and more likely to bend and snap off. It's the worst possible combination for food safety.
Can I use a pressure washer to clean my grill?
You can, but only on certain parts. A pressure washer works great for the exterior frame, drip trays, and cooking grates after they've cooled completely.
Never spray the burner tubes or gas lines with direct high-pressure water. Water can get into the gas ports and cause uneven flames or ignition problems. If you do use a pressure washer, let everything dry completely before reassembling and firing up the grill.
How can I tell if my grill grates need replacing?
Look for rust that doesn't come off with cleaning, deep pitting, or flaking porcelain coating. Cast iron with severe rust has lost its structural integrity. Stainless steel with deep scratches and rust spots is compromised.
If your food consistently sticks no matter how well you clean and oil the grates, it might be time for new ones. Replacement grates cost $30 to $80, depending on the brand and material. Replacing them is often cheaper than buying a whole new grill, and it extends your grill's life significantly.
Mistakes That Ruin Grills and Tools
We've seen plenty of grills ruined by well-meaning cleaning. Here are the mistakes to avoid, based on manufacturer documentation and aggregate owner feedback.
Using Metal Brushes on Porcelain
This is the fastest way to destroy a porcelain-coated grate. The coating chips, rust spreads underneath, and the grate needs replacing within a season.
Stick to wooden scrapers and nylon brushes for porcelain surfaces. Those are the only tools that clean without causing damage.
Scrubbing Cast Iron Down to Bare Metal
Cast iron seasoning is your friend. Scrubbing it away with a wire brush or harsh chemical strips the protective layer, and then rust takes over.
If you've stripped your cast iron grates, re-season them. Coat with oil, heat until smoking, and repeat a few times. It's a quick fix that saves your grates.
Cleaning Cold Grates
Cold grates are twice the work. Burnt residue hardens as it cools, forming a crust that resists scraping.
Clean while the grill is warm. The heat keeps residue soft, and the job takes under a minute. Don't let the grill sit overnight before tackling it.
Hosing Down a Hot Grill
Cold water on hot metal causes warping. Warped grates sit unevenly, create hot spots, and ruin your cooking surface.
Let the grill cool before any water-based cleaning. And remember, the daily scrape routine shouldn't involve water at all.
Forgetting to Oil After Cleaning
Skipping the oil step leaves grates vulnerable to rust. This is especially critical for cast iron, but stainless steel also benefits.
A quick wipe with oiled paper towel after each cleaning takes five seconds. It's the cheapest insurance you'll ever buy for your grill.
Real Scenarios: What Actually Happens
Let's walk through three common situations and see how the right tool choice plays out in practice.
The Weekend Warrior
You grill every Saturday during the summer. Between cooks, the grill sits covered on the patio.
With a wooden scraper, your Saturday cleanup takes 60 seconds. You preheat, scrape, wipe with oil, and you're done. The grates stay in great shape all season.
With a cheap wire brush, you spend five minutes scrubbing. The bristles start shedding by mid-July, and you find a stray wire stuck to your burger. The grill itself is covered in fine scratches.
The Stainless Steel Purist
You own a high-end gas grill with stainless steel grates that cost several hundred dollars to replace.
Using a flat metal scraper, you clean the grates in one smooth pass. The surface stays mirror-smooth, and the grill looks brand new years later.
Using a stainless steel wire brush, you leave visible swirl marks after the first clean. By the second season, small rust spots start appearing in the scratched areas.
The Cast Iron Caretaker
You've invested in thick cast iron grates that hold heat beautifully.
With a wooden scraper and regular oiling, the seasoning builds up over time. The grates become more non-stick with each cook.
With heavy scrubbing and soap, the seasoning strips away, and the grates rust within weeks. You spend a weekend re-seasoning, and the cycle repeats every month.
Pro Tips for Longer-Lasting Tools and Grates
Small habits make a big difference. Here are the tips we've gathered from manufacturer specs and experienced grillers.
Store Tools Dry and Protected
Moisture rusts metal tools and warps wooden handles. After each use, wipe tools down and store them in a dry spot, out of direct weather.
A simple hook inside your grill cabinet keeps everything off the ground and allows air to circulate.
Replace on a Schedule, Not When They Fail
Wooden scrapers wear down with use, but you don't have to wait until they snap. Replace the pack every couple of months and stay ahead of the curve.
Brushes lose bristles gradually. Inspect yours monthly and retire it the moment you see shedding.
Match the Tool to the Grate Every Time
Don't get lazy and use whatever's in your hand. Keep the correct tool for each grate type near the grill, so reaching for the wrong one is actually harder than grabbing the right one.
Oil After Every Clean
We've said it before, and we'll say it again. The oil step is non-negotiable for long grate life.
Use a high-smoke-point oil like canola, grapeseed, or vegetable. A tiny amount goes a long way.
Final Verdict: What to Buy Today
We've covered a lot of ground. Time to sum it all up.
The One-Tool Recommendation
Most people should buy a pack of wooden scrapers. They're cheap, safe on all grate types, and clean effectively without chemicals or wire bristles.
At under $15, there's no reason not to try them. If you own cast iron or porcelain-coated grates, this is the only tool you'll ever need.
The Two-Tool Setup
If you grill on stainless steel grates multiple times a week, add a flat metal scraper to your arsenal. The metal scraper handles heavy buildup in seconds, and the wooden scraper covers the rest.
Total cost: around $35. Total peace of mind: priceless.
The Bottom Line
The best grill cleaning tool depends on your grate material, but the overall winner is a wooden scraper for most people. Skip wire brushes, skip harsh chemicals, and stick to the simple two-minute routine.
Your grates will last longer, your food will taste better, and you'll spend less time scrubbing. That's a win no matter how you look at it.
That wraps up the core guide. If you're still deciding between a few options, the FAQs below should settle any lingering questions.
How long does a wooden scraper last?
With regular use, a single wooden scraper lasts about 4 to 6 cooks before it wears down or snaps. A pack of six covers a full grilling season for most households. Replace them as soon as they get too thin or start splintering, since a worn scraper loses its cleaning edge.
Can I use the same tool for my grill and my griddle?
Yes, as long as the surfaces are compatible. Wooden scrapers work on both cast iron grates and seasoned flat-top griddles. Flat metal scrapers are also fine on stainless steel griddle surfaces.
Just avoid using a griddle-specific scraper with a wide blade on narrow round grates, since it won't fit properly between the bars.
Do I need to clean the inside of my grill lid?
Yes, but not as often as the grates. Grease and smoke residue build up on the lid's interior over time, and eventually it starts flaking off onto your food.
Use a putty knife or plastic scraper on a cool grill to remove the big flakes, then wipe with a damp cloth. Avoid chemical degreasers here, since residue can drip onto food during the next cook.
What's the single biggest mistake new grill owners make?
Buying a stainless steel wire brush because it's what's hanging in the store. That one purchase leads to scratched porcelain, stripped cast iron seasoning, and the risk of bristles in food.
Start with a wooden scraper and you avoid every one of those problems. It's the simplest, safest first purchase you can make.
Is it worth buying an expensive grill cleaning kit?
Usually not. Most kits bundle a brush, scraper, and head replacements for $30 to $50. You can buy a wooden scraper pack and a flat metal scraper separately for less, and each tool will be better at its specific job.
The exception is griddle-specific kits, which include wide scrapers and cleaning pads that are genuinely useful for flat-top cooks. For standard grills, skip the bundle and pick your tools individually.
How do I get rid of the smell when I first use a new grill?
The smell comes from manufacturing oils burning off during the first preheat. It's completely normal.
Run the grill on high with the lid closed for 20 to 30 minutes before your first cook. This burns off the oils and any packaging residue. After that, you're ready to grill.
Should I clean my grill before or after cooking?
Both, but they serve different purposes. A quick scrape before cooking removes any dust or debris that settled since the last use. The main cleaning happens after cooking, while the grates are still hot.
The pre-cook pass takes about 10 seconds. The post-cook scrape takes about 30 seconds. Together, they keep your grill in top shape with minimal effort.
What happens if I use a wire brush on a hot grill?
Besides the bristle shedding risk, heat makes the metal bristles softer and more likely to bend and snap off. It's the worst possible combination for food safety.
Can I use a pressure washer to clean my grill?
You can, but only on certain parts. A pressure washer works great for the exterior frame, drip trays, and cooking grates after they've cooled completely.
Never spray the burner tubes or gas lines with direct high-pressure water. Water can get into the gas ports and cause uneven flames or ignition problems. If you do use a pressure washer, let everything dry completely before reassembling and firing up the grill.
How can I tell if my grill grates need replacing?
Look for rust that doesn't come off with cleaning, deep pitting, or flaking porcelain coating. Cast iron with severe rust has lost its structural integrity. Stainless steel with deep scratches and rust spots is compromised.
If your food consistently sticks no matter how well you clean and oil the grates, it might be time for new ones. Replacement grates cost $30 to $80, depending on the brand and material. Replacing them is often cheaper than buying a whole new grill, and it extends your grill's life significantly.
What's the best tool for cleaning between grill grates?
The gaps between round grates collect grease and carbon that regular scraping misses. A narrow putty knife or a stiff nylon brush with a pointed tip works best for these tight spaces.
For cast iron and porcelain grates, use a wooden scraper edge or a bamboo skewer to dislodge buildup. For stainless steel, a thin flat metal scraper slides between bars easily. Do this once a month during your deeper clean, not every cook.