How to Identify Squash Bug Eggs (2026) — What Actually Works
If you’ve ever watched a perfectly healthy zucchini vine collapse into a wilted mess in under a week, you already know the frustration. The culprit is almost always the squash bug, and catching them early is everything. That’s why knowing how to identify squash bug eggs is the single most effective skill you can develop as a gardener.
In our research, a single adult female can lay between 100 and 250 eggs over her lifespan, depositing new clusters every few days. Most gardeners spot the damage long after the eggs have hatched and the nymphs have already started feeding. By then, you’re fighting an uphill battle.
Let’s fix that starting right now.
Quick Answer
Squash bug eggs are tiny and barrel-shaped. They are bronze or copper colored. You will find them in neat clusters on the undersides of squash leaves.
The clusters hold 15 to 40 eggs each. Look along the leaf veins near the stem. Crush or scrape them off right away.
What Squash Bug Eggs Actually Look Like (And Why Photos Are Essential)
Here is the honest truth. No amount of written description will fully prepare you to spot these eggs. You need a clear visual reference in your mind.
That is why the first thing we recommend is looking at real photos from trusted sources like university extension guides or iNaturalist.
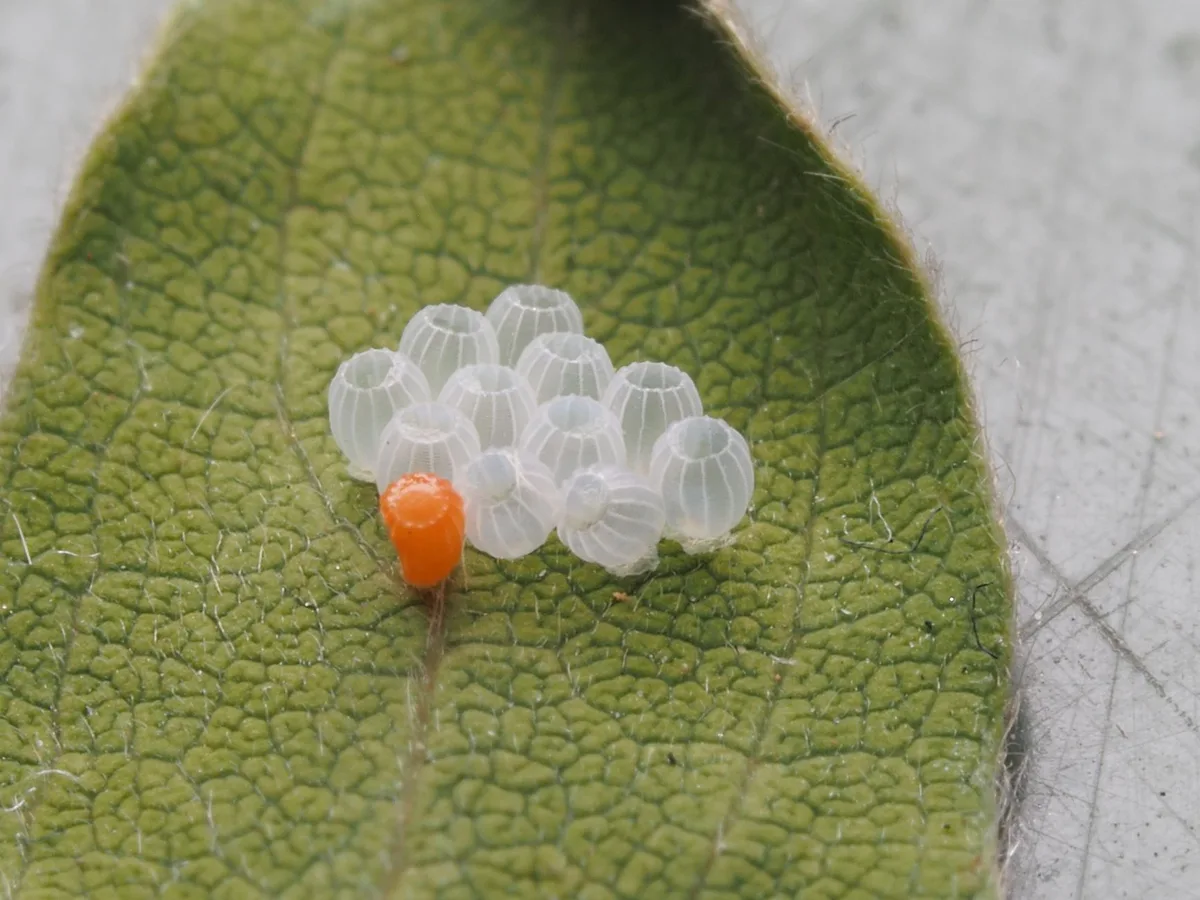
Squash bug eggs are not tiny white dots or single specks of dirt. They are distinct and organized. Freshly laid eggs are a reddish coppery gold, almost like tiny metallic barrels.
As they age over the next week, they darken to a dull bronze or brown. Right before hatching, they can look almost gray. This color shift is one of your most reliable clues.
The size is about 1/16 of an inch. That is roughly the size of a pinhead or a small grain of sand. They are small enough to miss easily but large enough to see with a naked eye if you know where to look.
Why are photos so critical for squash bug egg identification? Because you need to train your eye to see the pattern. The human brain is good at recognizing organized clusters once it knows what to look for.
Until then, these eggs just look like random debris or leaf damage. A good reference photo rewires your visual search in seconds.
As of 2026, the best free resources for identification photos come from the USDA Agricultural Research Service and state-level cooperative extension programs. These are the same sources master gardeners use for their training.
The 3 Visual Clues That Confirm You’re Looking at Squash Bug Eggs
There is no single feature that identifies squash bug eggs. You need to check all three clues together. If even one is missing, you may be looking at something else.
Clue 1: The Color
Fresh squash bug eggs are a distinct coppery bronze. Think of the color of a new penny mixed with the sheen of a beetle’s shell. They are not white, yellow, or bright orange.
Over the 7 to 10 days before hatching, the color shifts through three stages.
| Egg Stage | Color | What to Look For |
|---|---|---|
| Fresh (days 1-3) | Bright copper or reddish bronze | Shiny, almost metallic surface |
| Mature (days 4-7) | Dull bronze or brown | Loses the shiny sheen |
| Pre-hatch (days 7-10) | Grayish brown or dark tan | Eggs look slightly deflated at the top |
If you see a cluster of white or yellow eggs on a leaf underside, that is almost certainly a different insect. Ladybug eggs, for example, are bright yellow to orange. Stink bug eggs are a pale tan or greenish white.
Clue 2: The Shape
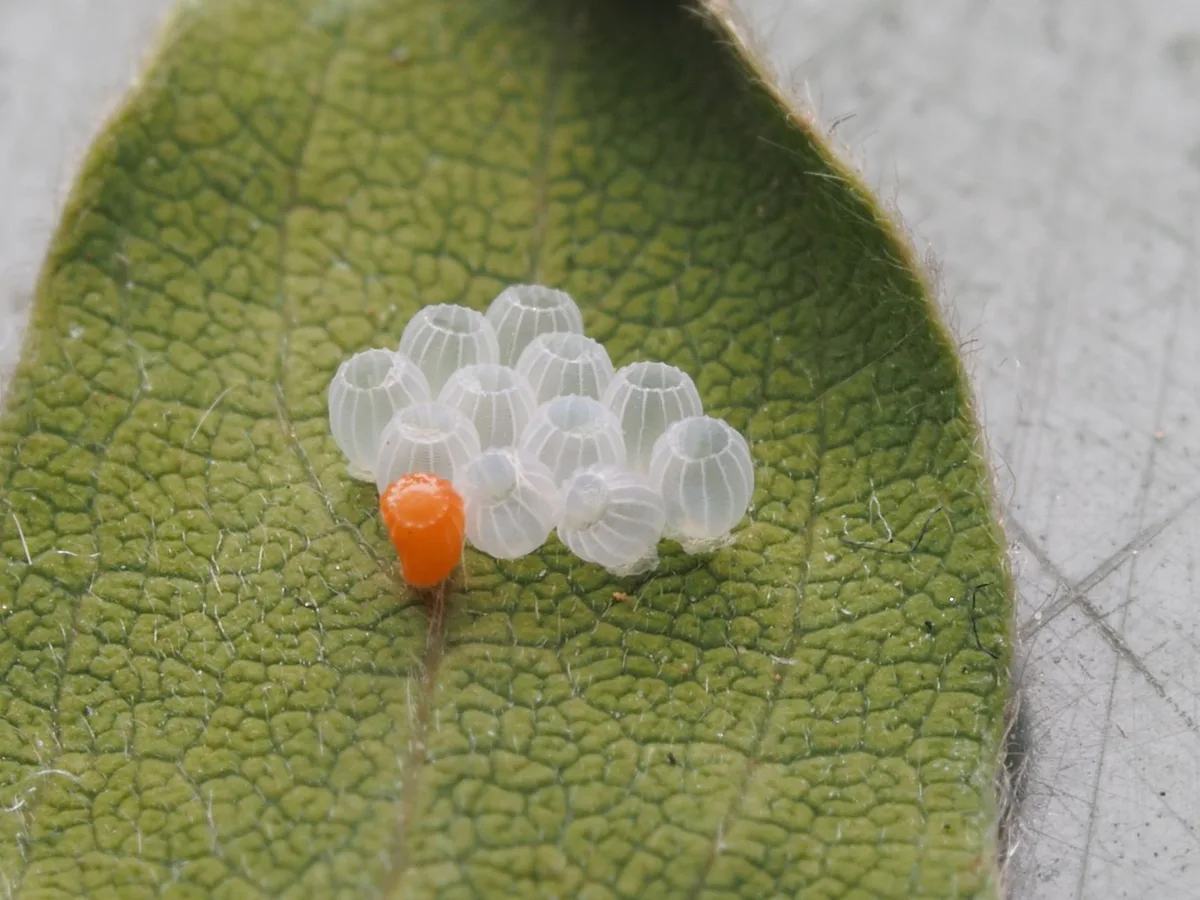
This is the giveaway. Squash bug eggs are not round like tiny balls. They are barrel shaped.
Picture a miniature grain of rice that is slightly wider in the middle and flat on top.
Here is the critical detail. Each egg has a tiny lid called an operculum at the top. This is where the nymph will emerge when it hatches.
Under a magnifying glass or a phone camera zoom, you can see a faint ring around the top of each egg. That ring is the lid.
Eggs that are perfectly round, spindle shaped, or elongated like a football are not squash bugs. The barrel shape with a flat top is unique.
Clue 3: The Arrangement
Squash bugs do not scatter their eggs randomly. They lay them in tight, organized clusters. The eggs are placed side by side in neat rows, often forming a V shape or a small hexagon pattern along the leaf vein.
A typical cluster contains 15 to 40 eggs. They touch each other at the edges. The cluster looks deliberate, almost like a tiny honeycomb or a carefully placed batch of caviar.
If you find eggs scattered individually across the leaf or in a loose, messy group, keep looking. Loose clusters are more typical of stink bugs or cucumber beetles. Squash bug eggs are always glued firmly to the leaf surface and arranged with clear purpose.
Where Exactly to Search: The Underside Leaf Map
Knowing what to look for is only half the battle. You also need to know where to look. Squash bugs are creatures of habit, and they follow a consistent pattern when laying eggs.
Start with the leaf underside. Never scan the top of the leaf. Squash bugs glue their eggs to the bottom surface almost exclusively.
Flip every leaf over like you are checking the back of a card.
Focus on the veins. The female squash bug prefers to lay her eggs right along the main leaf veins, especially near where the veins branch off into smaller ones. The eggs are often tucked into the natural groove between the vein and the leaf surface.
Work from the base upward. Squash bugs start laying eggs on the oldest, lowest leaves of the plant first. These leaves are closest to the soil and provide the most cover.
Check the bottom 4 to 6 leaves of every plant before you move higher. If you only check the newer growth at the top, you will miss the eggs entirely.
Pay special attention to the crown area where the stem meets the soil. The crown is the central point where all the vines originate. Squash bugs often lay their first clusters there because it is the most sheltered spot.
For zucchini, summer squash, and pumpkins, the leaves are large and easy to flip. For winter squash varieties with tougher, hairier leaves, the eggs can be harder to spot. Run your fingers gently along the underside of those leaves.
You will feel the slight bump of the egg clusters before you see them.
Do not skip volunteer plants or seedlings. Squash bugs target young plants aggressively. If you have new squash plants emerging from last year’s compost pile or seeds that overwintered in the garden, those are prime targets.
Side-by-Side: Squash Bug Eggs vs. Stink Bug Eggs vs. Ladybug Eggs
This is where most gardeners get confused. There are several insects that lay small, clustered eggs on the undersides of leaves. Three of them look similar enough to cause mistakes.
Fortunately, the differences are clear once you know what to check.
| Feature | Squash Bug Eggs | Stink Bug Eggs | Ladybug Eggs |
|---|---|---|---|
| Color | Coppery bronze to brown | Pale tan, greenish white, or light yellow | Bright yellow to orange |
| Shape | Barrel shaped with flat top and lid | Barrel shaped but slightly rounded at top | Elongated, spindle shaped, upright |
| Arrangement | Neat rows in V or hexagon patterns | Loose clusters, often in a spiral | Standing on end in tight clusters of 10 to 50 |
| Location | Underside of squash leaves, along veins | Underside of many plants, random | Near aphid colonies, on any plant |
| Danger to garden | Extreme, devastates squash plants | Moderate, damages fruit but not vines | Beneficial, kills aphids and pests |
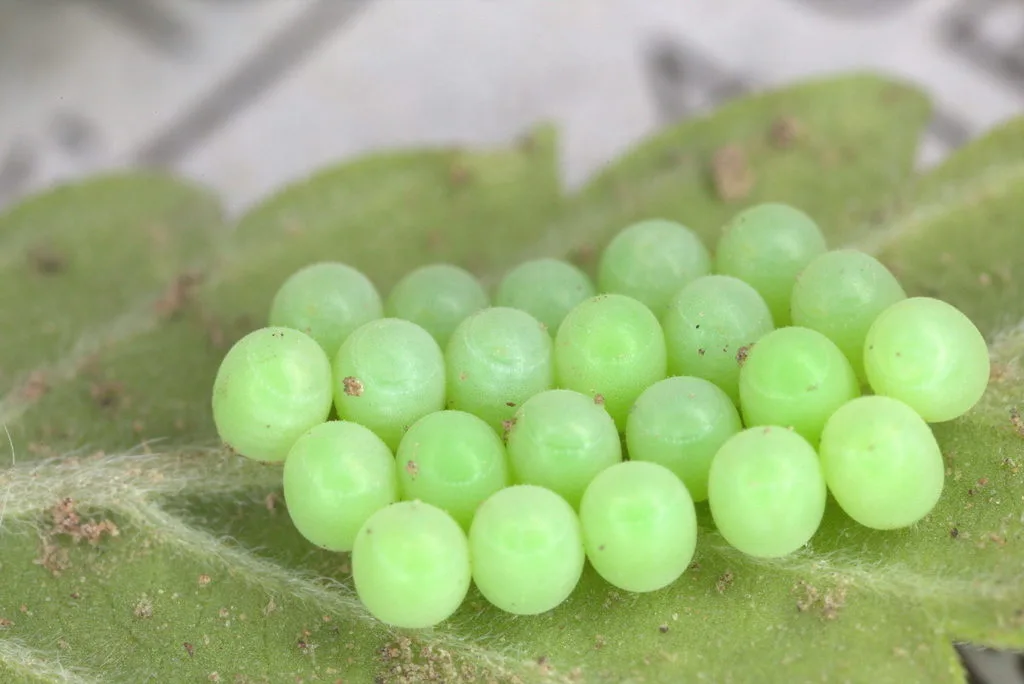
The biggest mistake is destroying ladybug eggs. Ladybugs are your allies. Their eggs are bright yellow or orange and stand upright in clusters, like tiny bananas packed together.
They do not have the flat top and lid that squash bug eggs do. If you see ladybug eggs near an aphid infestation, leave them alone. Those eggs will hatch into larvae that eat hundreds of aphids each.
Stink bug eggs are the closest lookalike. They are also barrel shaped and laid in clusters. The key difference is color and arrangement.
Stink bug eggs are pale tan or greenish white, not the rich copper bronze of fresh squash bug eggs. Stink bugs also tend to lay their eggs in a more scattered spiral pattern, not the neat V rows of squash bugs.
If you are unsure, take a photo with your phone and zoom in. Compare the color and the pattern against a known reference. A few seconds of comparison can save you from a costly misidentification.
Common Visual Traps That Fool Even Experienced Gardeners
Even seasoned gardeners make identification mistakes. The eggs are small, and nature is full of lookalikes. Here are the three most common traps and how to avoid them.
Dirt or Debris
A speck of dried soil on a leaf underside looks surprisingly like a squash bug egg. The difference is simple. Dirt does not stick firmly.
Rub your finger gently across the spot. Dirt brushes off. Squash bug eggs are cemented to the leaf and will not move.
Leaf Galls or Fungal Spots
Some fungal infections create small raised brown bumps on leaves. These can mimic the color and size of squash bug eggs. Galls and spots are random and irregular.
They do not form organized rows or clusters. If the spots are scattered without any pattern, they are not eggs.
Dead Aphid Bodies
Aphids that have been parasitized by wasps turn into round brown mummies. These can look like individual eggs. Parasitized aphids are scattered and solitary.
They lack the barrel shape and the lid. They also do not appear in neat clusters along veins.
The best rule is the cluster test. Squash bug eggs always appear in organized groups of 15 or more. If you see a single brown dot or a random scatter, it is almost certainly something else.
Step-by-Step Scouting Routine for Early Detection
Catching squash bug eggs early is a numbers game. You need to check often and check thoroughly. Here is a routine that works.
Step 1: Pick your time. Scout every 3 to 4 days during the growing season. This matches the egg hatching cycle. Eggs laid on day one will not hatch until day seven minimum.
A 3 day interval means you catch every cluster before nymphs emerge.
Step 2: Start at ground level. Kneel down and look at the lowest leaves first. These are the oldest leaves and the preferred egg laying sites. Work your way up the plant systematically.
Step 3: Flip every leaf. Use one hand to hold the stem and the other to turn the leaf over. Scan the entire underside surface. Focus on the main vein and the branching veins.
This is where eggs are most common.
Step 4: Look for adults too. While you are searching for eggs, watch for adult squash bugs. Adults are dark gray brown, flattened, and about 5/8 inch long. They move slowly and hide under leaves or near the crown.
If you see adults, eggs are nearby.
Step 5: Remove what you find. Scrape or crush every egg cluster immediately. Do not wait. A single cluster left behind can hatch into 40 hungry nymphs.
Step 6: Log your findings. Keep a simple note of which plants had eggs and how many clusters you removed. This helps you track hot spots and adjust your scouting schedule.
Make this a morning habit. The light is better, and the eggs reflect more of that coppery sheen in early sunlight. After 10 minutes of practice, you will be able to check a full row of squash plants in under 5 minutes.
What Happens After They Hatch: Nymph ID at a Glance
Knowing what the nymphs look like is just as important as identifying the eggs. Nymphs cause the damage. They feed on the plant stems and leaves, injecting a toxin that causes wilting.
Freshly hatched nymphs are tiny. They are about 1/10 inch long at first. Their bodies are gray white with black legs and black antennae.
The contrast between the pale body and dark legs is the easiest way to spot them.
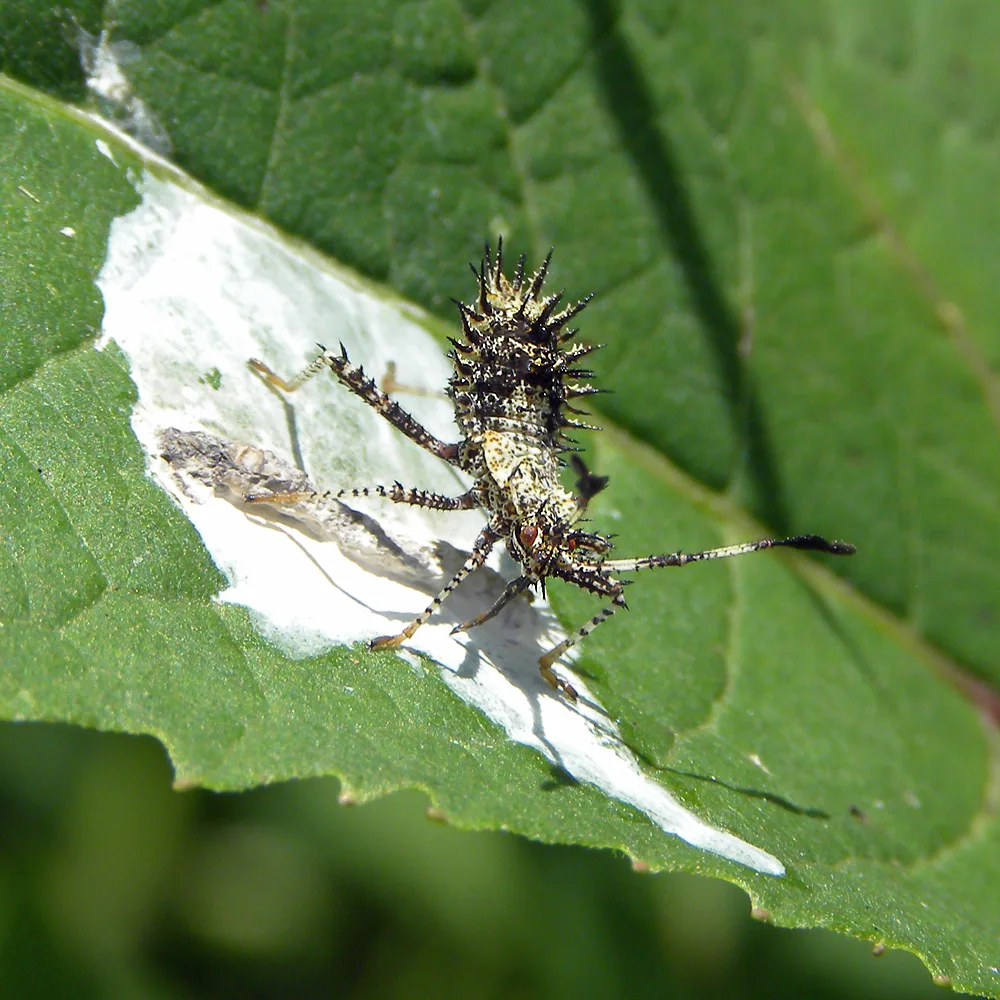
As the nymphs grow, they molt through five stages called instars. Each stage brings a color change.
| Instar | Size | Color |
|---|---|---|
| First | 1/10 inch | Gray white, black legs and head |
| Second | 1/8 inch | Light gray, legs darkening |
| Third | 1/4 inch | Darker gray, wing pads starting |
| Fourth | 3/8 inch | Brownish gray, wing pads visible |
| Fifth | 1/2 inch | Dark gray brown, almost adult like |
The total time from hatching to adult is 4 to 6 weeks. Warm weather speeds this up. Cool weather slows it down.
Nymphs cluster together in the early stages. You will often find a group of 20 to 40 nymphs on a single leaf or stem. They scatter when disturbed but quickly regroup.
If you see a cluster of tiny gray bugs with black legs on a squash plant, you have squash bug nymphs.
Do not confuse them with aphids. Aphids are soft bodied and come in many colors including green, black, and yellow. Squash bug nymphs are always gray to brown with that distinct dark leg contrast.
Aphids also tend to cluster on new growth and flower buds, while squash bug nymphs are found on stems and older leaves.
Mistakes to Avoid When Removing Eggs
Removing squash bug eggs is simple. But there are a few common mistakes that reduce your effectiveness.
Mistake 1: Crushing eggs on the leaf. Pressing eggs against the leaf surface can damage the leaf tissue. It also leaves behind residue that can attract ants or cause fungal issues. Better to scrape the eggs off into a container or onto the ground.
Mistake 2: Dropping eggs on the soil. If you scrape eggs off and they fall into the mulch or soil, some may still hatch. Always collect the eggs in a cup of soapy water or crush them firmly on a hard surface away from the plant.
Mistake 3: Missing the hidden clusters. The lowest leaves and the crown area are easy to overlook. These are the most common hiding spots. Spend extra time checking the base of each plant.
Mistake 4: Removing eggs without checking for adults. Eggs mean an adult female is nearby. If you remove the eggs but leave the adults, you will have new eggs in 48 hours. Always do a full sweep for adults after you finish egg removal.
Mistake 5: Using water to wash eggs off. A strong spray from a hose can knock some eggs loose, but many will stay glued to the leaf. The water also spreads nymphs and adults to other plants. Mechanical removal is more reliable.
The best tool for removal is your thumbnail or a dull knife. Scrape the cluster off in one motion. Drop the eggs into a jar of soapy water.
Dispose of the jar contents in the trash, not the compost pile.
Pro Tips for Shooting Your Own Identification Photos
Taking your own photos of suspected egg clusters is a powerful tool. It lets you zoom in, compare with reference images, and confirm your identification. Phone cameras work well for this.
Use the 2x or 3x zoom. Most phone cameras have a telephoto or digital zoom option. Do not stand too close. Back up slightly and use the zoom to get a clear, focused image of the leaf surface.
Add a light source. Hold a flashlight or use your phone’s flash at an angle from the side. This creates shadows that highlight the barrel shape and the tiny lid on each egg. Flat overhead light washes out the details.
Use your hand as a shade. If you are shooting in bright sun, the leaf can be washed out. Cup your free hand around the leaf to create consistent shade. This brings out the copper color of the eggs.
Take a photo of the whole leaf first. Then take a close up of the cluster. This gives you context for later comparison. The wide shot shows you exactly where on the plant the eggs were located.
Upload to iNaturalist for confirmation. The iNaturalist community includes entomologists and master gardeners who can verify your identification. This is a free resource that improves your skills over time.
A good identification photo should clearly show the color, the barrel shape, and the arrangement of the eggs. If you can capture all three in one frame, you have a reliable record.
Quick Reference: Squash Bug Egg ID Checklist
Use this checklist when you are in the garden and need a fast confirmation.
- Color: Copper bronze to brown. Not white, yellow, or green.
- Shape: Barrel shaped with a flat top and a tiny lid.
- Arrangement: Neat rows in V or hexagon patterns.
- Location: Underside of squash leaves, along the main veins.
- Cluster size: 15 to 40 eggs touching each other.
- Adhesion: Eggs are glued firmly. They do not brush off.
If the cluster matches all six points, you have squash bug eggs. Remove them immediately.
When to Call It Quits and Step Up Control Measures
Manual egg removal works well for small gardens and light infestations. There comes a point where it stops being effective.
If you find more than 10 new clusters per week across your plants, the population is too high for hand removal alone. Adult females are outlaying the eggs faster than you can clear them.
If your plants are starting to wilt despite regular egg removal, the nymphs and adults are already feeding on the vines. Eggs are not the only problem at this stage. The damage is already underway.
At this point you need to step up your approach. Apply a targeted insecticidal soap or neem oil spray to the undersides of all leaves. Focus on the crown and the lowest leaves.
Follow the label instructions exactly. Repeat every 5 to 7 days until the infestation drops.
Consider using row covers on healthy plants that have not yet been affected. Row covers exclude the adult bugs and prevent them from laying eggs in the first place. Install them before flowers appear so pollinators can still do their work.
For next season, practice crop rotation. Do not plant squash in the same bed two years in a row. Adult squash bugs overwinter in plant debris and emerge in spring.
Rotating your crops breaks that cycle.
Frequently Asked Questions
Can squash bug eggs be on the top of the leaf?
It is very rare. Squash bugs almost always lay eggs on the underside of leaves. If you find a cluster on the upper surface, check the three visual clues carefully.
It may be a different insect entirely.
How long do squash bug eggs take to hatch?
Eggs hatch in 7 to 10 days. Warmer weather speeds up the process. Cooler weather slows it down.
Check your plants every 3 to 4 days to catch them before hatching.
What happens if I miss the eggs and they hatch?
The nymphs begin feeding immediately. They inject a toxin into the plant stems that causes wilting. Left unchecked, a large infestation can kill a mature squash plant in under two weeks.
Can I compost leaves with squash bug eggs on them?
No. Home compost piles do not reach high enough temperatures to kill the eggs. The eggs will hatch in the compost.
Always dispose of infested plant material in the trash or burn it.
What do I do if I find squash bug eggs on my flowers?
Squash bugs feed on cucurbits. They do not infest most flowers. If you find copper colored eggs on a flower leaf, it may be a different species.
Check the shape and arrangement against the visual clues in this guide.