Guide to Monthly Gardening Checklist 2026: Explained Simply
If you have ever searched for a monthly gardening checklist and found a list that tells you to plant tomatoes in April no matter where you live, you already know the problem. That kind of advice works in one climate and fails everywhere else. A real monthly plan has to bend around your local weather, your soil, and what you actually want to grow.
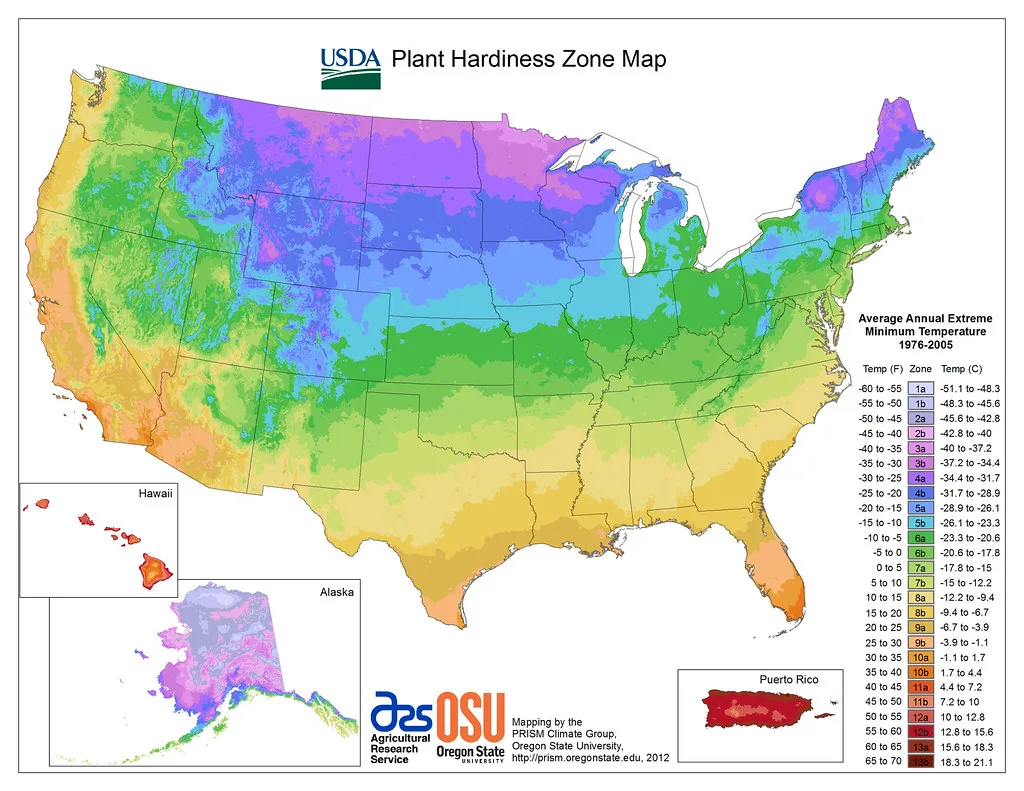
The United States alone spans 13 USDA hardiness zones, with last frost dates ranging from late January in parts of Florida to early June in northern Minnesota. That is a four-month gap in the starting gun. Here is the research-backed approach to building a monthly checklist that actually fits your garden.
Quick Answer
A monthly gardening checklist tracks timing for planting, pruning, fertilizing, and pest control. It depends entirely on your hardiness zone and frost dates. Use those two numbers to build a custom schedule.
Skip any calendar that ignores your climate. The right checklist changes by month, crop type, and local conditions.
Why a One-Size-Fits-All Garden Calendar Won’t Work
Most generic gardening calendars come from a single source written for a single region. That might be the Pacific Northwest or the mid-Atlantic, but it is presented as universal. If you live in Arizona, Maine, or Texas, those dates are useless.
The problem is that temperature and daylight behave differently across zones. A task like “plant cool-season crops in early March” works for Zone 7 but kills seedlings in Zone 4, where the ground is still frozen. The same applies to pruning.
Prune spring-blooming shrubs in autumn in a mild climate and you lose next year’s flowers. In a cold climate, you risk winter damage to the cuts.
Our research across extension service bulletins from multiple states confirms one thing. The only reliable way to schedule garden work is to base it on your local frost window and zone. Fixed-date calendars cause more problems than they solve.
The Two Numbers That Rule Your Entire Schedule: Frost Dates and Hardiness Zone
The two numbers you need are your average last spring frost date and your USDA hardiness zone.

Your last spring frost date tells you when the risk of freezing temperatures has dropped low enough to plant warm-season crops. Your first fall frost date tells you when the growing season ends. The gap between them is your season length.
Your hardiness zone tells you which perennials, trees, and shrubs can survive your winter lows. A plant rated for Zone 5 will die in a Zone 3 winter without protection. Knowing your zone also helps you estimate soil warm-up timing.
Soil in Zone 6 warms faster than soil in Zone 4, even if the calendar says the same month.
You can find your zone from the official USDA map. For frost dates, the National Weather Service and many county extension offices publish local averages. Use those numbers, not a generic online calculator, because microclimates vary within the same county.
Step 1: Pin Down Your Local Variables (Zone, Frost Dates, Microclimate)
You need three pieces of data before you touch a seed packet.
Your hardiness zone. This is your baseline. It tells you what can survive winter without protection. Write it down.
For example, if you are in Zone 6a, your average minimum temperature range is -10 to -5°F.
Your average last spring frost date. This is your trigger for warm-season planting. Cool-season crops can go in a few weeks before this date. Warm-season crops go in after.
The exact date varies by location, so look up your town or the nearest weather station.
Your microclimate. Your yard is not the same as the official weather station. A south-facing slope warms earlier. A low spot collects cold air and frost.
Urban areas hold more heat at night. Adjust your calendar by one to two weeks based on what you see in your own garden each spring.
Track these three variables in a garden journal. After one season, you will have your own personalized dates that beat any generic chart.
For gardeners in warmer regions, choosing the right plants matters as much as timing. Our guide to the best trees for hot dry climates covers species that handle heat stress without extra watering.
Step 2: Map Your Crops to Your Season Window (Days to Maturity, Heat Tolerance)
Once you know your season length, you need to match it to each crop’s requirements.
Days to maturity. This number comes from the seed packet. It tells you how many days from planting to harvest. But there is a catch.
That number assumes ideal conditions. Real gardens run slower in cool weather and faster in heat. Add a buffer of 10 to 14 days for cool-spring planting.
Heat tolerance. Some crops bolt or stop producing when temperatures hit 85°F. Broccoli, spinach, and peas fall into this group. Others thrive in heat.
Okra, sweet potatoes, and melons need warm soil and air. Your monthly checklist needs separate tracks for cool-season and warm-season crops.
Succession planting. Crops with short maturity times, like radishes and lettuce, can be planted every two to three weeks for a continuous harvest. Your checklist should include repeat planting windows for these crops.
Indoor start timing. Long-season crops like tomatoes and peppers need a head start indoors. Count backward from your last frost date by the recommended weeks on the seed packet. For peppers, that is usually 8 to 10 weeks.
For tomatoes, 6 to 8 weeks.
A good grow light makes a real difference during that indoor phase. Our rundown of the best grow light for seedlings covers the specs you want for strong, stocky transplants.
Step 3: Build Your Monthly Branch, Early to Late Season Adjustments
Now you have your zone, your frost dates, and your crop timeline. The monthly checklist branches into four distinct phases.
Early Season (Last Frost to 4 Weeks After)
This is the scramble period. Soil temperatures are rising. Cool-season crops are already in the ground.
Warm-season transplants go out after the frost date passes.
Your tasks in this phase include hardening off seedlings, transplanting warm-season crops, direct sowing beans and squash, and staying alert for late frost warnings. Cover tender plants if a freeze threatens.
Check soil temperature with a probe before planting warm-season crops. Soil needs to hit 60°F for tomatoes and 65°F for peppers and eggplant. Planting into cold soil stunts root growth and invites disease.
Mid Season (Peak Summer Heat)
This phase runs from roughly four weeks after last frost until six weeks before first frost. The focus shifts to maintenance.
Water deeply and less often to encourage deep roots. Mulch around plants to hold moisture and suppress weeds. Watch for pests like aphids, squash bugs, and hornworms.
Harvest regularly to keep plants producing.
This is also the time for a second round of planting. Bush beans, summer squash, and cucumbers can go in for a late-season harvest. In zones with long seasons, start fall brassicas indoors now.
Late Season (6 Weeks Before First Frost to First Frost)
The season is winding down. Days are shorter. Nights are cooler.
Your tasks shift to ripening and protection.
Pinch off new tomato flowers so the plant puts energy into existing fruit. Cover tender crops with row cover if frost threatens before you are ready to pull them. Harvest pumpkins and winter squash before a hard freeze.
Plant cool-season fall crops now. Kale, spinach, carrots, and turnips tolerate light frost and taste better after cold weather.
If you grow flowers in your garden beds, late season is also when you assess what worked. Our guide to the best flowers for flower beds includes long-blooming varieties that carry color through early frosts.
Dormant Season (Post-Frost to Pre-Spring)
Once hard frost kills back tender plants, it is cleanup and prep time.
Remove spent plants and add them to the compost pile unless they showed signs of disease. Diseased material goes in the trash. Spread compost or aged manure over empty beds.
Plant garlic and spring-flowering bulbs now.
Test your soil pH and nutrient levels every two to three years. Fall is a good time to amend based on results. Lime takes months to work, so applying it in autumn gives it time before spring planting.
Clean and sharpen your tools. Drain hoses and store them indoors. Order seeds for next season early, especially popular varieties that sell out by February.
Monthly Task Breakdown by Zone Band (Zone 3–6, 7–8, 9–11)
Your monthly checklist shifts significantly depending on which zone band you live in. Here is a practical breakdown for the three broad groups.
Zone 3 to 6 (short to moderate seasons). Your last frost falls between mid-April and early June. Start seeds indoors 6 to 10 weeks before that date. Direct sow cool crops like peas and spinach 3 to 4 weeks before the frost date.
Warm crops go out after the risk passes. You have a narrow window for succession planting. Focus on fast-maturing varieties.
In late summer, plant fall greens and root crops by early August.
Zone 7 to 8 (long seasons). Last frost arrives between mid-March and mid-April. You can direct sow many crops earlier. Plant tomatoes and peppers in mid to late April.
Succession plant beans and squash every 3 weeks through July. Start fall brassicas in July for a November harvest. Your dormant season is short.
Use it for soil amending and tool maintenance.
Zone 9 to 11 (warm year-round). Your last frost is February or earlier. You can grow three full seasons. Plant cool crops in fall and winter.
Plant warm crops in spring and fall. Summer heat may stop production for many vegetables. Use shade cloth and mulch to extend the season.
Focus on heat-tolerant varieties like okra, sweet potatoes, and melons. Your monthly checklist runs on a two-cycle year instead of one.
For each band, adjust your pruning and fertilizing schedule too. In cold zones, stop fertilizing by late summer to avoid tender new growth before frost. In warm zones, fertilize lightly through winter for perennials.
Common Timing Mistakes That Wreck Harvests (and How to Avoid Them)
Even experienced gardeners slip up on timing. Here are the most common errors we see in research and feedback.
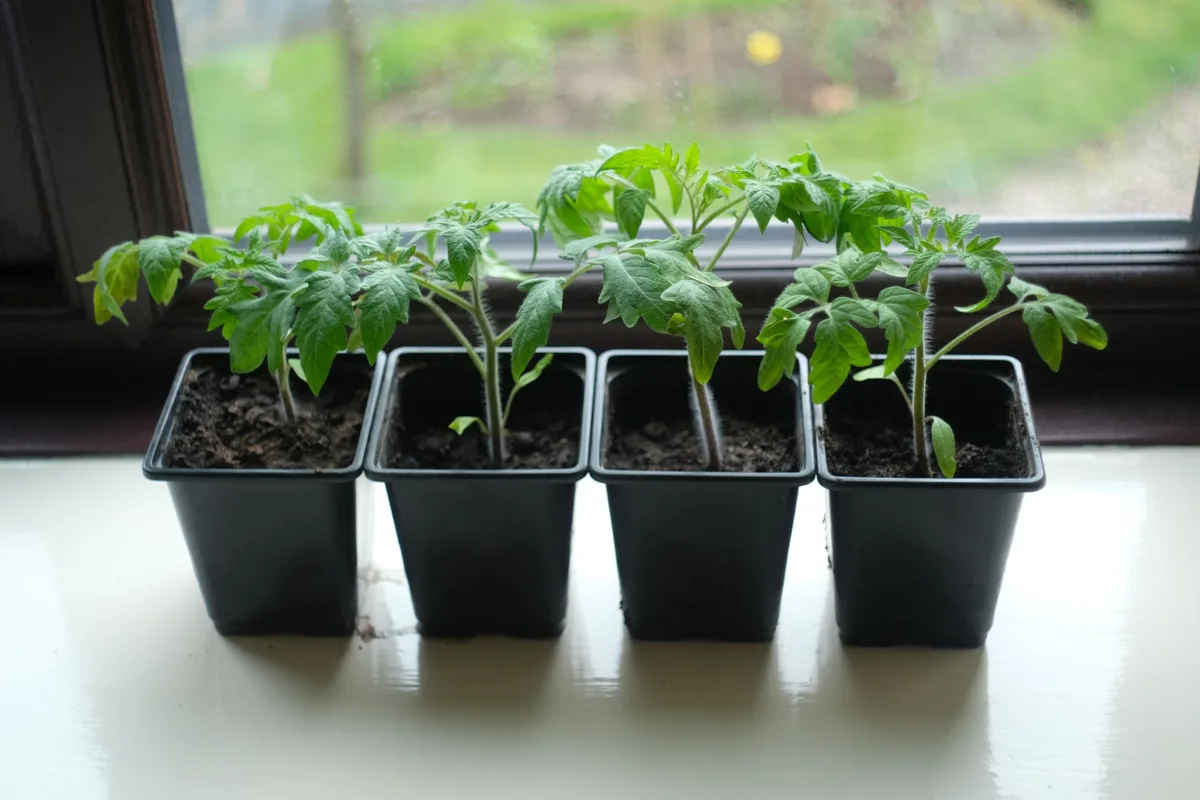
Planting warm-season crops too early. Soil temperature matters more than the calendar. Tomato roots stop growing below 55°F. Planting into cold soil stunts growth and invites root rot.
Use a soil thermometer. Wait until the soil hits 60°F at a 4-inch depth. If a late frost threatens after planting, cover transplants with row cover or cloches overnight.
Pruning at the wrong time. Prune spring-flowering shrubs like lilacs and azaleas right after they bloom. Prune them in fall or winter and you remove next year’s flower buds. Summer-flowering shrubs like butterfly bush can be pruned in early spring.
Check the bloom time before you cut.
Forgetting to harden off seedlings. Indoor-grown plants need a week of acclimation before they go outside. Start with one hour of filtered sun. Increase exposure daily.
Skip this step and leaves get sunburned. The plant may die or take weeks to recover.
Ignoring the second planting window. Many gardeners plant once and stop. But crops like beans, squash, and greens can be replanted for a fall harvest. Check your days to maturity against your first frost date.
If you have 60 days left, you can still direct sow bush beans.
When to Use a Fixed Date Checklist vs. a Condition-Based Workflow
Your choice depends on your climate stability.
Use a fixed date checklist if you live in a region with predictable seasons. Zones 5 to 7 in temperate climates often have reliable frost windows. The last frost falls within a week of the average most years.
In that case, you can print a calendar and follow it with small tweaks.
Use a condition-based workflow if your weather is variable. Coastal areas, high elevations, and desert regions see late frosts or early heat waves regularly. In those places, a fixed date schedule will fail one year in three.
Instead, base tasks on soil temperature, leaf emergence, and weather forecasts.
Here is the decision rule. If your last frost date varies by more than two weeks from year to year, use the condition-based approach. If it stays within a week, a fixed calendar works fine with minor adjustments.
The condition-based workflow requires more observation. You need a soil thermometer and a weather app. You check conditions weekly rather than following a printed list.
That sounds like more work, but it saves you from replanting after a surprise frost.
How to Adapt Your Monthly Checklist for Containers, Raised Beds, or In-Ground
Each growing method changes the timing.
Containers warm up faster than in-ground soil. You can plant warm-season crops 1 to 2 weeks earlier. But containers also dry out faster and cool down at night.
Use a lightweight potting mix and water daily in hot weather. Move containers to a sheltered spot if a late frost threatens.
Raised beds drain faster and warm earlier than ground soil, especially if they are built above grade. You can plant 1 to 2 weeks earlier than in-ground beds in spring. But the soil also cools faster in fall.
Cover raised beds with row cover to extend the season on both ends.
In-ground beds have more thermal mass. They warm slowly and stay warm longer in fall. Plant in-ground beds on the later side of the frost window.
Use them for long-season crops like winter squash and pumpkins that need consistent moisture.
Adjust your checklist by adding a note for each bed type. For example, if your main checklist says “plant peppers after last frost,” add a sub-note for containers: “plant peppers 1 week before last frost if protected.” Keep a separate column in your garden journal for each bed type.
For indoor seedlings, transplant timing also differs. Container and raised bed plants can go out slightly earlier if you monitor soil temperature. In-ground plants should wait until the soil hits the target temperature at the full 4-inch depth.
The Minimalist Monthly Checklist (Essential Tasks Only)
If you want to keep gardening simple without getting buried in tasks, here is a stripped-down list per month. Focus on these actions and ignore the rest.
| Month | Essential Task |
|---|---|
| January | Order seeds. Check tools. |
| February | Start indoor seeds for long-season crops. |
| March | Harden off seedlings. Plant cool-season crops outdoors. |
| April | Plant warm-season crops after frost. Mulch beds. |
| May | Water deeply. Harvest cool crops. |
| June | Succession plant beans. Watch for pests. |
| July | Plant fall brassicas indoors. Harvest regularly. |
| August | Sow fall greens. Prune spent plants. |
| September | Plant garlic. Cover tender crops. |
| October | Clean up diseased plants. Apply compost. |
| November | Protect perennials. Store hoses. |
| December | Review your journal. Plan next year. |
This table assumes a temperate zone with a typical April to October season. Adjust the month names based on your zone. If you live in Zone 9, move March tasks to February and October tasks to November.
The minimalist list skips fertilizing schedules and pruning specifics. Those depend on your specific plants. Add them only if you grow heavy feeders like tomatoes or roses.
For most home gardens, following these monthly essentials will keep you producing without the stress of a 20-item list.
Pro Tips for Fine-Tuning the Workflow Each Year
Your first year with a custom checklist will be rough. That is normal. The real value comes from adjusting it based on what you observe.
Keep a garden journal. Write down your actual last frost date each year. Note when soil hit 60°F. Record which crops thrived and which failed.
After three seasons, you will have your own localized calendar that beats any generic chart.
Watch your microclimate. One corner of your yard may stay warmer or cooler by a full week. Adjust your checklist for that spot. Move container plants to warm microclimates early in the season.
Compare notes with neighbors. If they planted two weeks earlier and got better results, your microclimate may be colder than you think. Or they may have gotten lucky with a protected spot. Cross-reference their experience with your data.
Review seed packet days to maturity every year. Suppliers occasionally update their varieties. A tomato that matured in 75 days five years ago may now need 80 days. That matters for your fall planting window.
Frequently Asked Questions About Monthly Gardening Schedules
How do I find my exact last frost date?
Check the National Weather Service database for your nearest station. County extension offices also publish local averages. Do not rely on a generic national map.
Your zip code matters.
What if my monthly checklist says one thing and the weather looks different?
Trust the weather, not the calendar. If the forecast shows a late frost, delay planting even if your checklist says it is time. A condition-based workflow always beats a fixed date schedule.
Can I use the same checklist for flowers and vegetables?
Mostly yes. The timing for planting, fertilizing, and watering follows similar patterns. But pruning differs.
Prune spring-blooming flowers right after bloom. Prune vegetables only to remove damaged growth.
How often should I update my garden journal?
Write in it weekly during the growing season. Note rainfall, temperatures, pest sightings, and harvest amounts. Monthly notes are not enough.
Weekly data lets you spot trends early.
Do I need a different checklist for container gardens?
Yes. Containers warm faster in spring and cool faster in fall. Adjust your planting dates one to two weeks earlier for warm-season crops.
Watering and fertilizing needs also differ from in-ground beds.
What is the biggest mistake beginners make with monthly checklists?
Following a generic calendar from a different region. A checklist written for Zone 8 will fail in Zone 4. Always build your schedule around your own zone and frost dates.
That one change fixes most timing problems.
Your Decision Guide: Start Here Based on Your Experience Level
If you are a beginner. Start with the minimalist monthly checklist in this article. Focus on the essential tasks per month. Ignore everything else.
Keep a simple journal. After one season, add more detail.
If you have one season of experience. Build your full zone-based workflow. Use your journal data to adjust planting dates. Add succession planting and fall crops to your checklist.
If you are experienced. Fine-tune your microclimate adjustments. Track soil temperature instead of dates. Experiment with season extension tools like row covers and cold frames.
Share your findings with local gardening groups.
If you garden in a challenging climate. Use the condition-based workflow exclusively. Track frost dates, soil temps, and rainfall. Adjust your monthly checklist by week, not by month.
Focus on heat-tolerant or cold-adapted varieties based on your zone.
Your monthly checklist is a living document. It will change every year as you learn more about your specific garden. That is the point.
A good checklist grows with you.